Remove Movie Finder: Stop Unwanted Redirects
Movie Finder: Complete Uninstall Process
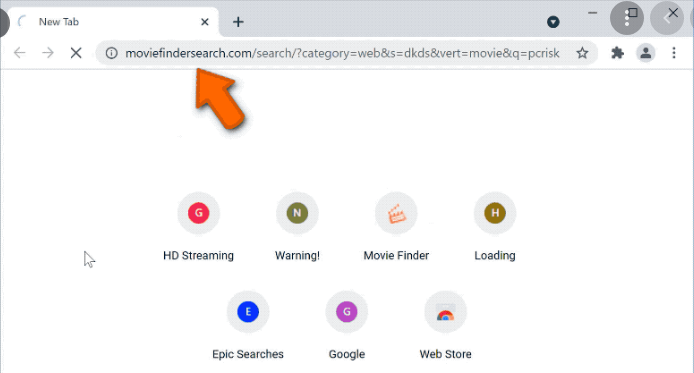
Movie Finder is promoted as a useful tool that allows easy access to movie-related content. However, it is indeed a browser hijacker program which once gets installed, makes changes to default browser’s settings to promote moviefindersearch.com- a fake search engine. This perilous hijacker sets this nasty domain as the new search engine, homepage and new tab URLs and grabs complete control over the entire browser. To prevent the settings from being restored, it also installs various suspicious extensions, plug-ins, add-ons etc. on the browser. Due to its illusive distribution methods, it is also considered as a potentially unwanted program (PUP).
Movie Finder Alters Search Results:
When you use the search provider endorsed by Movie Finder, you are redirected to Yahoo. This happens because these deceptive search tools are not able to deliver results by themselves, so they usually reroute to legitimate ones. However, the results you acquire are still not relevant as they often contain malicious ads and sponsored links. During the presence of this nasty hijacker in your work-station, you are bombarded with thousands of annoying advertisements all over the day which interrupts your web sessions badly.
Movie Finder ads come in multiple forms such as coupons, deals, banners, offers, pop-ups, discounts etc. They earn revenues for the creators with each click made on them. We highly advise to stay away from these adverts as they might redirect you to several phishing/scam, tech support scam, malware-laden, gaming, gambling and other insecure pages once clicked. Creators of this hijacker only care about generating online profits; they have nothing to do with users’ safety and privacy. It is even capable of tracking web activities and collecting important information. Data gathered by Movie Finder might include:
- searched queries;
- visited URLs;
- viewed webpages
- IP addresses;
- geolocations,
- personally identifiable details, etc.
Afterwards, all the collected details are shared with commercial content creators and even cyber criminals and can be employed for generating personalized advertisements, making fraudulent transactions, deceptive purchases and for other illusive purposes. So, it may lead to severe privacy issues, identity theft and huge financial losses. This notorious parasite even alters the settings of Windows registry to create persistence and cause victims to suffer from hard drive crash, application malfunctioning, software failure, boot errors and other perilous dilemmas. Thus, a quick Movie Finder removal is what you need to perform as soon as you detect its presence.
Penetration Of Movie Finder:
Software bundling method is utilized in the distribution of potentially unwanted programs (PUPs), and such applications generally cannot be installed without the users’ interaction. Therefore, we suggest you be more cautious when installing new software on your work-station. This usually happens when installing a freeware using the Recommended or Quick configuration settings after downloading it from free file-hosting site like softonic.com, download.com, soft32.com, cnet.com etc.
The most important thing is to always select the Custom/Advanced settings for the setup because then you will see the complete list of additional third-party contents bundled with your download. Your task is to opt-out all additional items included to your preferred program and only then proceed to the next setup stage. In case your PC is already infected with this hijacker, you must remove Movie Finder from the computer without wasting any time.
Special Offer (For Windows)
Movie Finder can be creepy computer infection that may regain its presence again and again as it keeps its files hidden on computers. To accomplish a hassle free removal of this malware, we suggest you take a try with a powerful Spyhunter antimalware scanner to check if the program can help you getting rid of this virus.
Do make sure to read SpyHunter’s EULA, Threat Assessment Criteria, and Privacy Policy. Spyhunter free scanner downloaded just scans and detect present threats from computers and can remove them as well once, however it requires you to wiat for next 48 hours. If you intend to remove detected therats instantly, then you will have to buy its licenses version that will activate the software fully.
Special Offer (For Macintosh) If you are a Mac user and Movie Finder has affected it, then you can download free antimalware scanner for Mac here to check if the program works for you.
Antimalware Details And User Guide
Click Here For Windows Click Here For Mac
Important Note: This malware asks you to enable the web browser notifications. So, before you go the manual removal process, execute these steps.
Google Chrome (PC)
- Go to right upper corner of the screen and click on three dots to open the Menu button
- Select “Settings”. Scroll the mouse downward to choose “Advanced” option
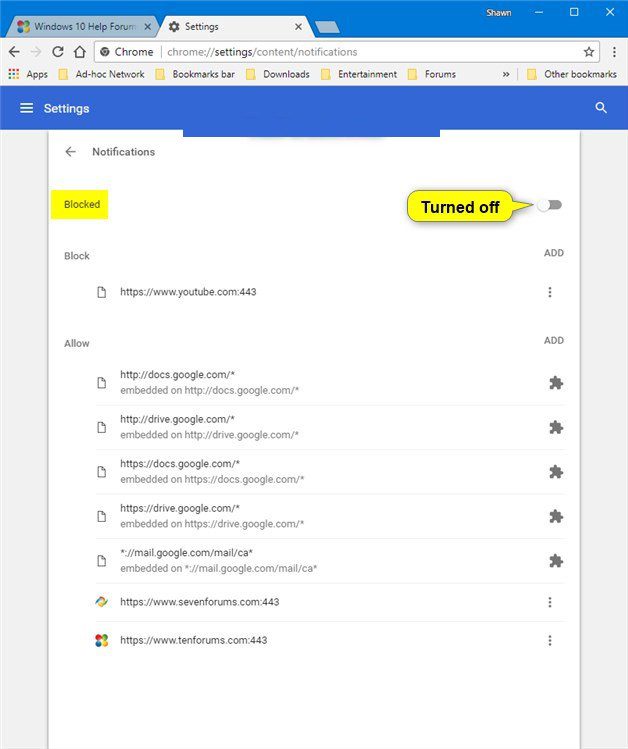
- Go to “Privacy and Security” section by scrolling downward and then select “Content settings” and then “Notification” option
- Find each suspicious URLs and click on three dots on the right side and choose “Block” or “Remove” option
Google Chrome (Android)
- Go to right upper corner of the screen and click on three dots to open the menu button and then click on “Settings”
- Scroll down further to click on “site settings” and then press on “notifications” option
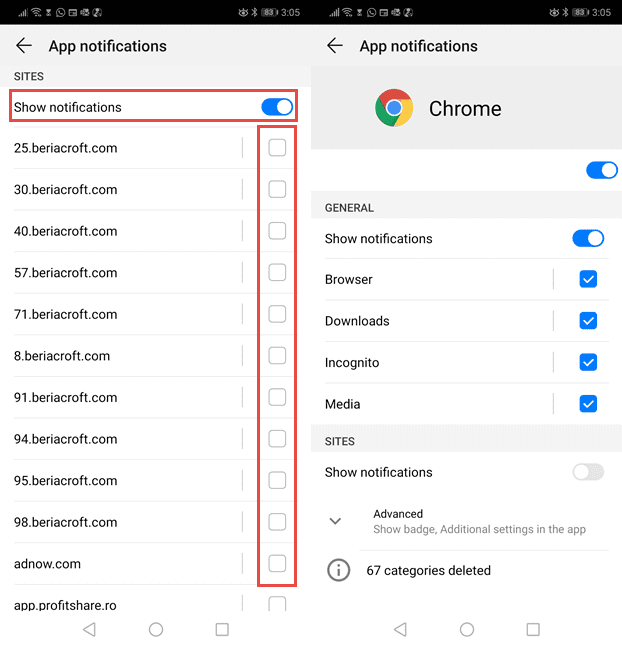
- In the newly opened window, choose each suspicious URLs one by one
- In the permission section, select “notification” and “Off” the toggle button
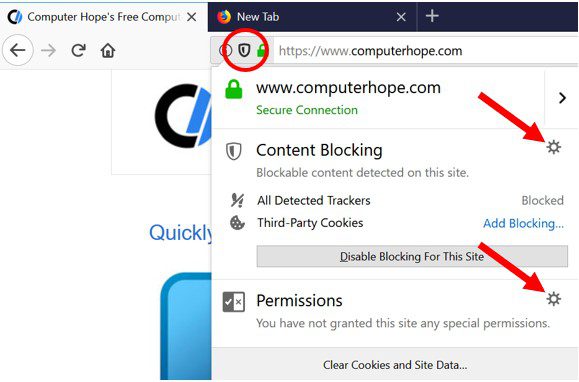
Mozilla Firefox
- On the right corner of the screen, you will notice three dots which is the “Menu” button
- Select “Options” and choose “Privacy and Security” in the toolbar present in the left side of the screen
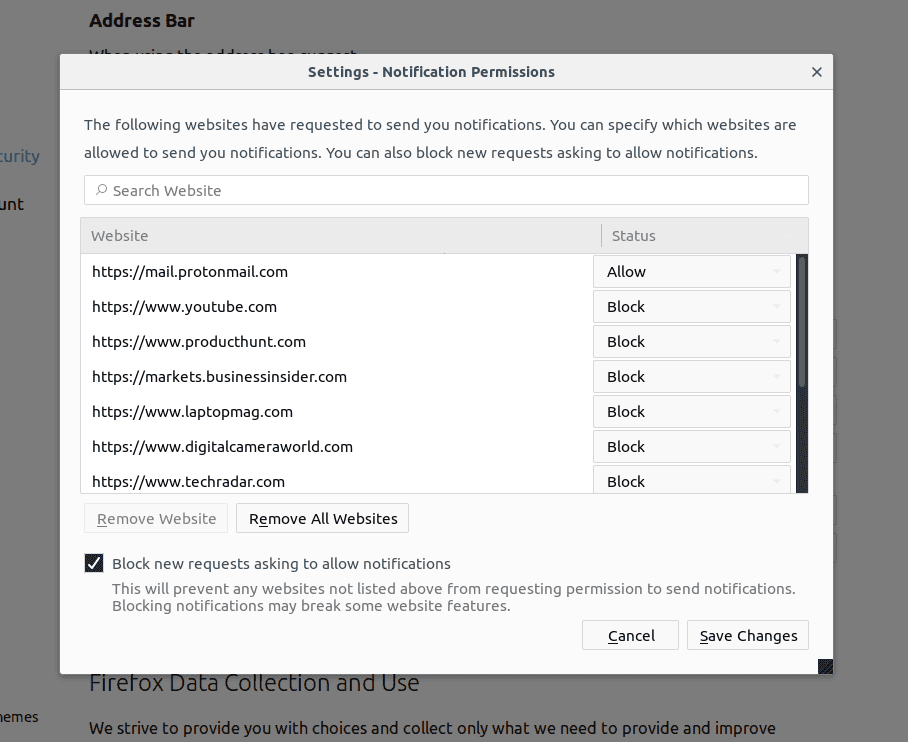
- Slowly scroll down and go to “Permission” section then choose “Settings” option next to “Notifications”
- In the newly opened window, select all the suspicious URLs. Click on the drop-down menu and select “Block”
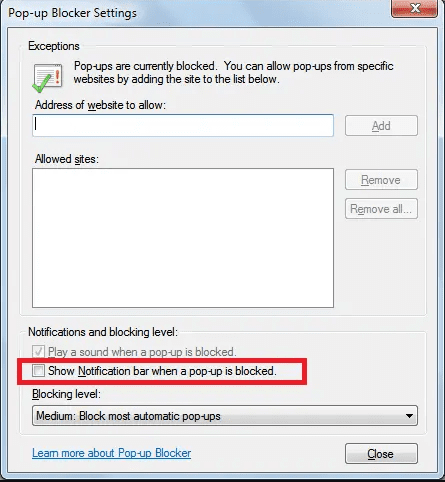
Internet Explorer
- In the Internet Explorer window, select the Gear button present on the right corner
- Choose “Internet Options”
- Select “Privacy” tab and then “Settings” under the “Pop-up Blocker” section
- Select all the suspicious URLs one by one and click on the “Remove” option
Microsoft Edge
- Open the Microsoft Edge and click on the three dots on the right corner of the screen to open the menu
- Scroll down and select “Settings”
- Scroll down further to choose “view advanced settings”
- In the “Website Permission” option, click on “Manage” option
- Click on switch under every suspicious URL
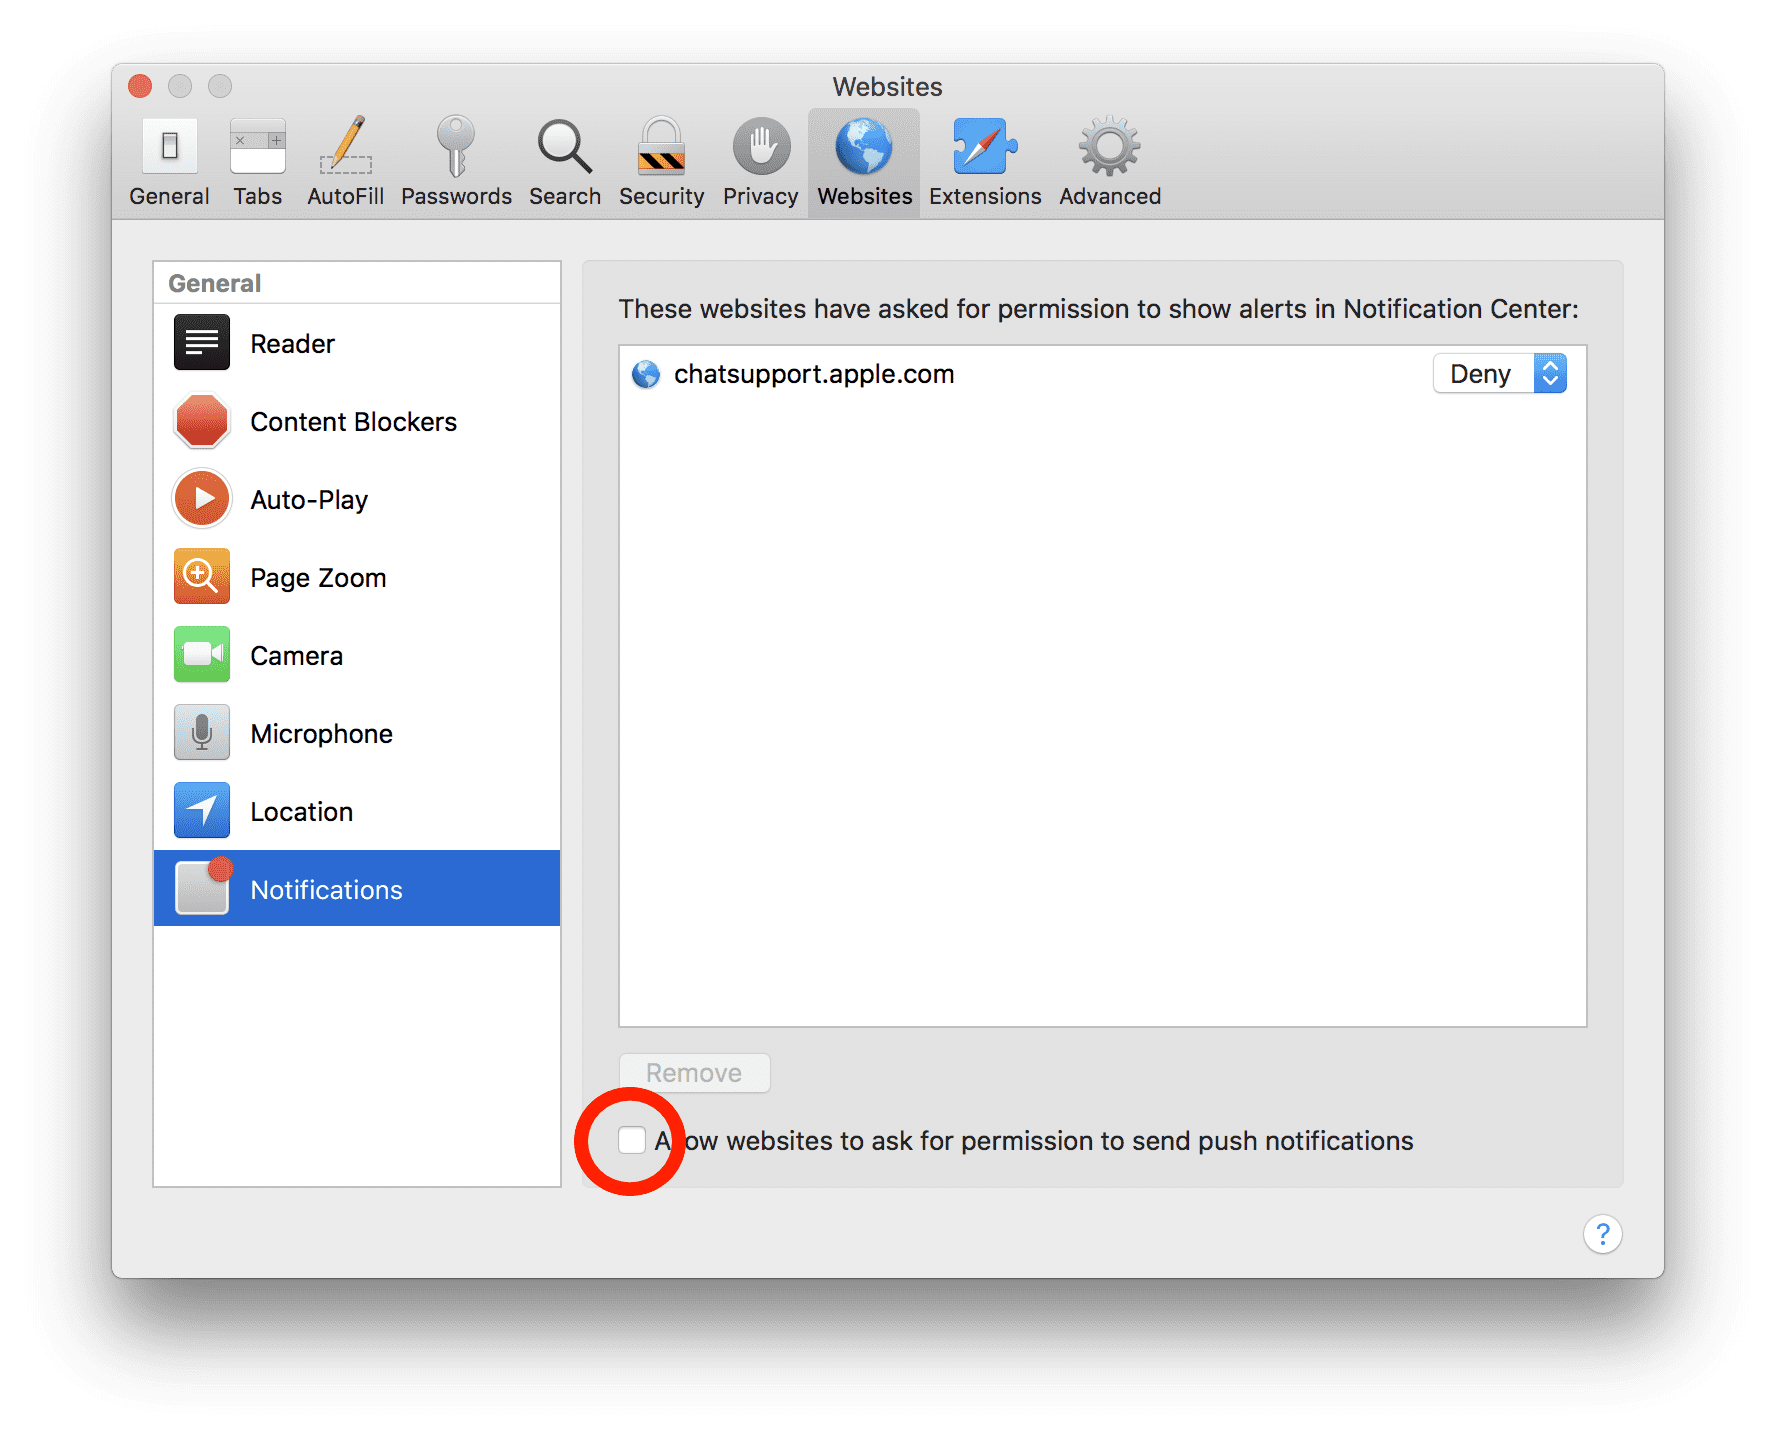
Safari (Mac):
- On the upper right side corner, click on “Safari” and then select “Preferences”
- Go to “website” tab and then choose “Notification” section on the left pane
- Search for the suspicious URLs and choose “Deny” option for each one of them
Manual Steps to Remove Movie Finder:
Remove the related items of Movie Finder using Control-Panel
Windows 7 Users
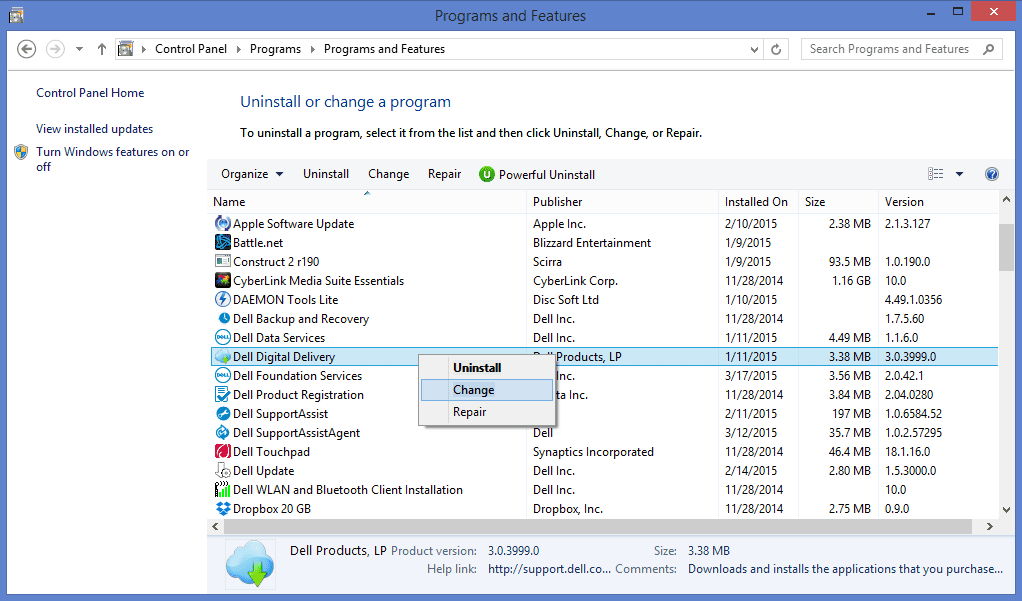
Click “Start” (the windows logo at the bottom left corner of the desktop screen), select “Control Panel”. Locate the “Programs” and then followed by clicking on “Uninstall Program”
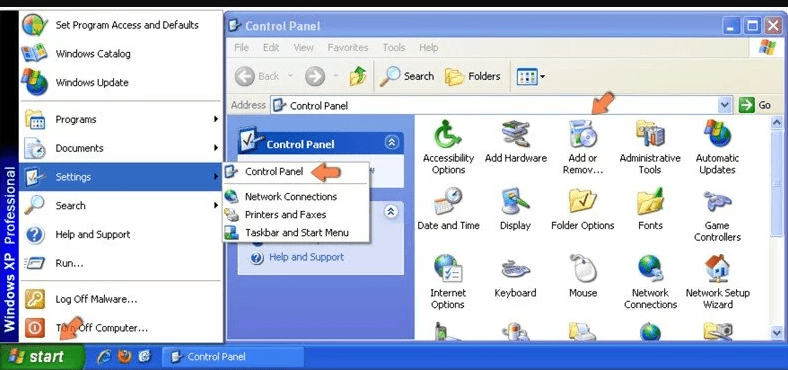
Windows XP Users
Click “Start” and then choose “Settings” and then click “Control Panel”. Search and click on “Add or Remove Program’ option
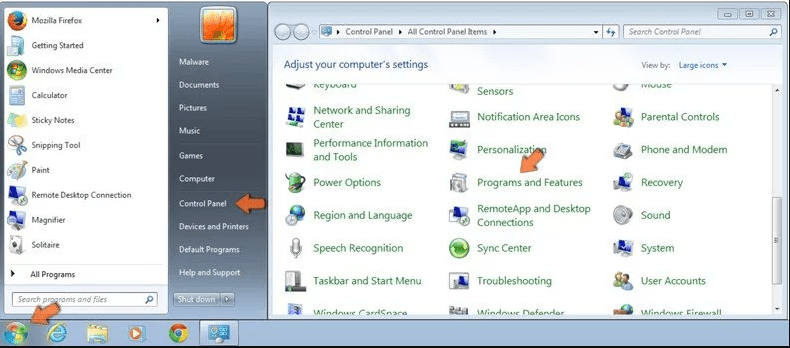
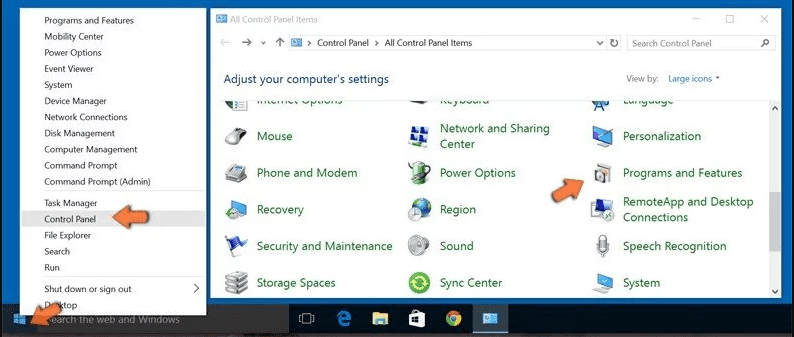
Windows 10 and 8 Users:
Go to the lower left corner of the screen and right-click. In the “Quick Access” menu, choose “Control Panel”. In the newly opened window, choose “Program and Features”
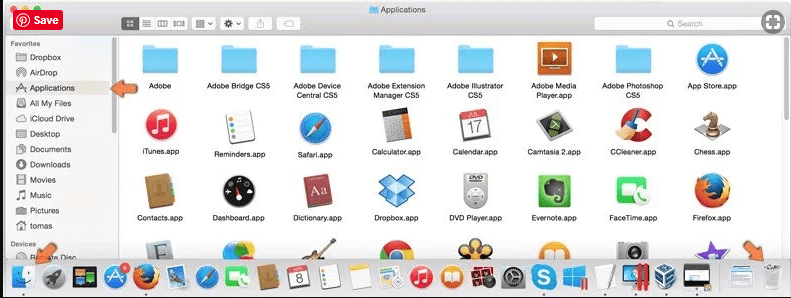
Mac OSX Users
Click on “Finder” option. Choose “Application” in the newly opened screen. In the “Application” folder, drag the app to “Trash”. Right click on the Trash icon and then click on “Empty Trash”.
In the uninstall programs window, search for the PUAs. Choose all the unwanted and suspicious entries and click on “Uninstall” or “Remove”.
After you uninstall all the potentially unwanted program causing Movie Finder issues, scan your computer with an anti-malware tool for any remaining PUPs and PUAs or possible malware infection. To scan the PC, use the recommended the anti-malware tool.
Special Offer (For Windows)
Movie Finder can be creepy computer infection that may regain its presence again and again as it keeps its files hidden on computers. To accomplish a hassle free removal of this malware, we suggest you take a try with a powerful Spyhunter antimalware scanner to check if the program can help you getting rid of this virus.
Do make sure to read SpyHunter’s EULA, Threat Assessment Criteria, and Privacy Policy. Spyhunter free scanner downloaded just scans and detect present threats from computers and can remove them as well once, however it requires you to wiat for next 48 hours. If you intend to remove detected therats instantly, then you will have to buy its licenses version that will activate the software fully.
Special Offer (For Macintosh) If you are a Mac user and Movie Finder has affected it, then you can download free antimalware scanner for Mac here to check if the program works for you.
How to Remove Adware (Movie Finder) from Internet Browsers
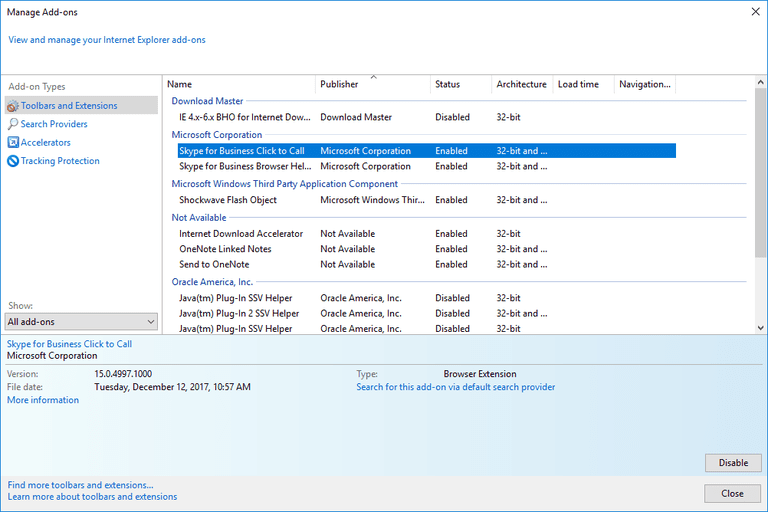
Delete malicious add-ons and extensions from IE
Click on the gear icon at the top right corner of Internet Explorer. Select “Manage Add-ons”. Search for any recently installed plug-ins or add-ons and click on “Remove”.
Additional Option
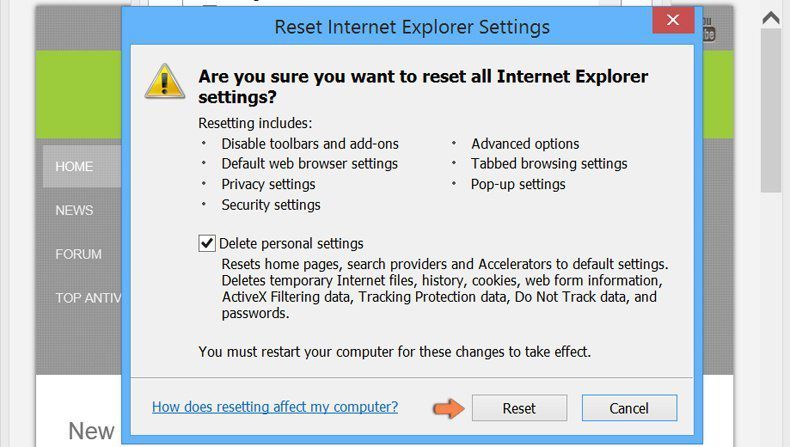
If you still face issues related to Movie Finder removal, you can reset the Internet Explorer to its default setting.
Windows XP users: Press on “Start” and click “Run”. In the newly opened window, type “inetcpl.cpl” and click on the “Advanced” tab and then press on “Reset”.

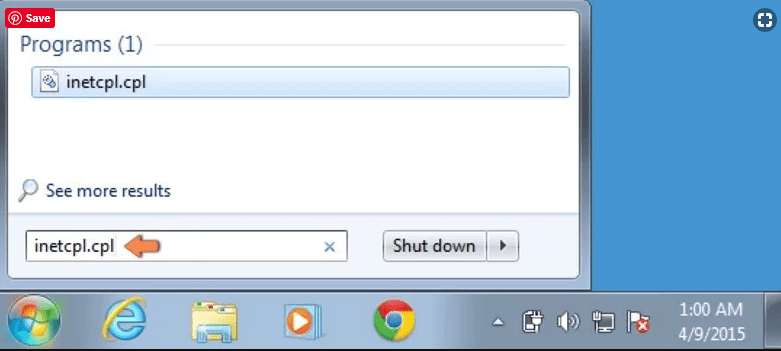
Windows Vista and Windows 7 Users: Press the Windows logo, type inetcpl.cpl in the start search box and press enter. In the newly opened window, click on the “Advanced Tab” followed by “Reset” button.
For Windows 8 Users: Open IE and click on the “gear” icon. Choose “Internet Options”
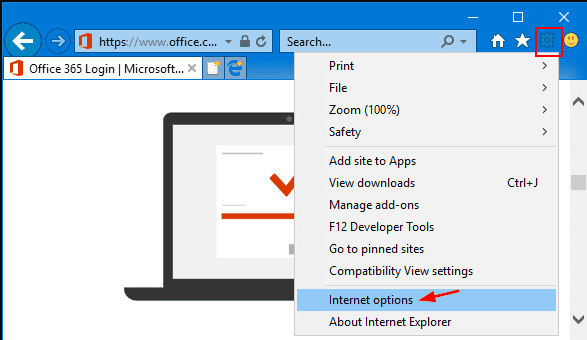
Select the “Advanced” tab in the newly opened window
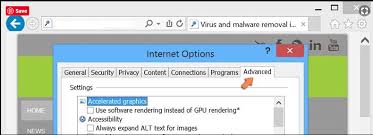
Press on “Reset” option

You have to press on the “Reset” button again to confirm that you really want to reset the IE
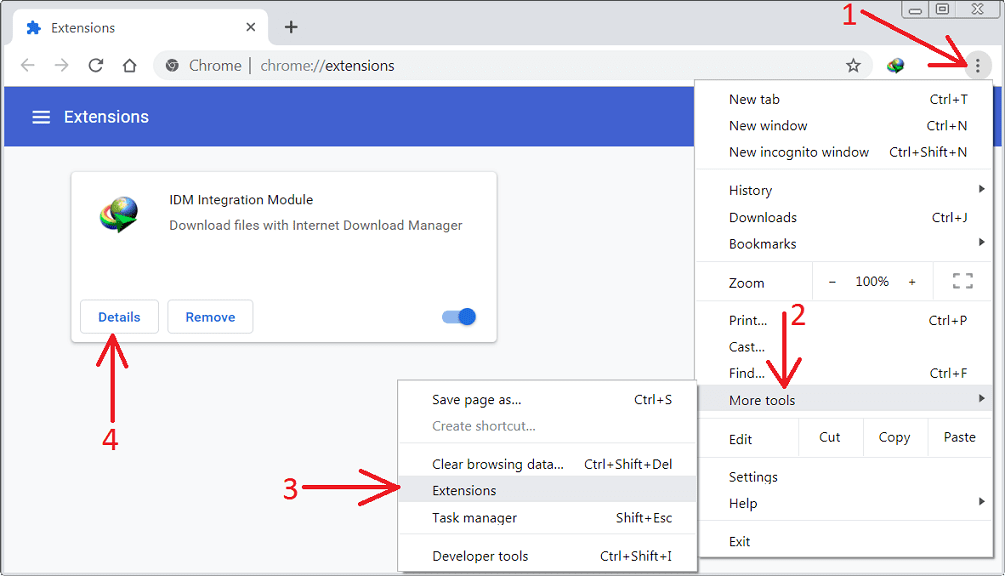
Remove Doubtful and Harmful Extension from Google Chrome
Go to menu of Google Chrome by pressing on three vertical dots and select on “More tools” and then “Extensions”. You can search for all the recently installed add-ons and remove all of them.
Optional Method
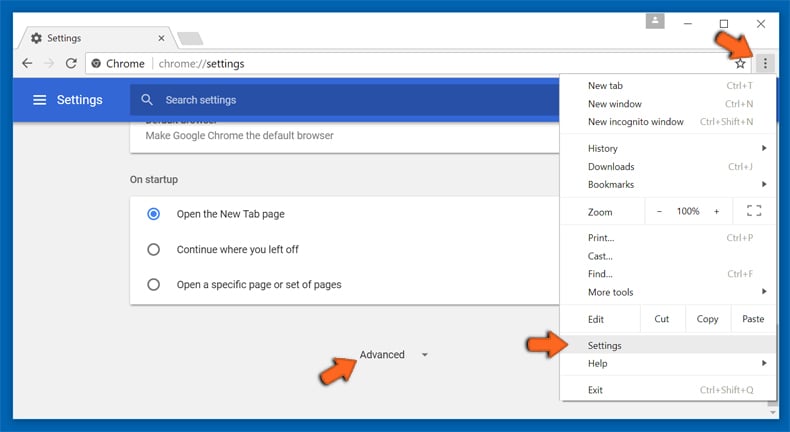
If the problems related to Movie Finder still persists or you face any issue in removing, then it is advised that your reset the Google Chrome browse settings. Go to three dotted points at the top right corner and choose “Settings”. Scroll down bottom and click on “Advanced”.
At the bottom, notice the “Reset” option and click on it.
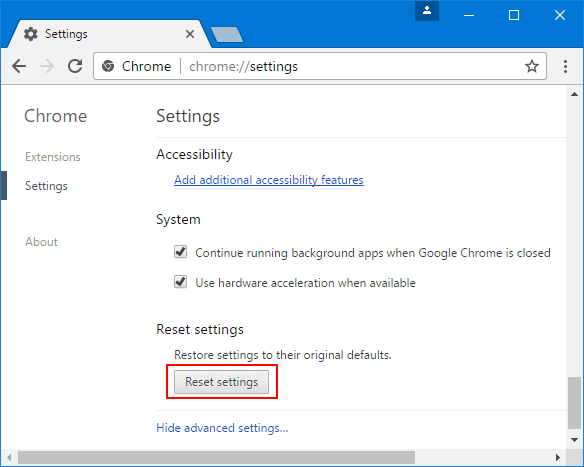
In the next opened window, confirm that you want to reset the Google Chrome settings by click on the “Reset” button.

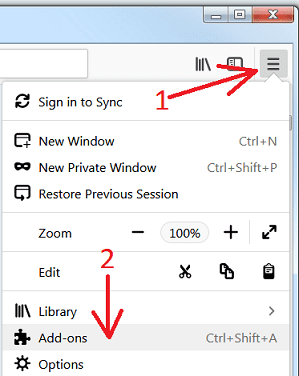
Remove Movie Finder plugins (including all other doubtful plug-ins) from Firefox Mozilla
Open the Firefox menu and select “Add-ons”. Click “Extensions”. Select all the recently installed browser plug-ins.
Optional Method
If you face problems in Movie Finder removal then you have the option to rese the settings of Mozilla Firefox.
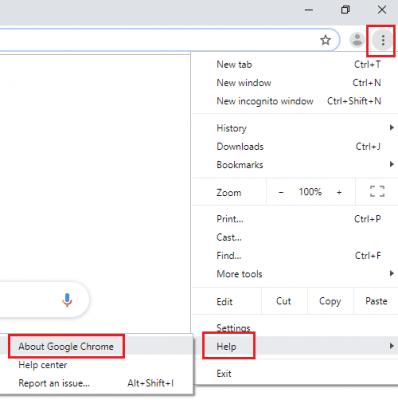
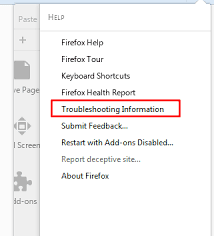
Open the browser (Mozilla Firefox) and click on the “menu” and then click on “Help”.
Choose “Troubleshooting Information”
In the newly opened pop-up window, click “Refresh Firefox” button
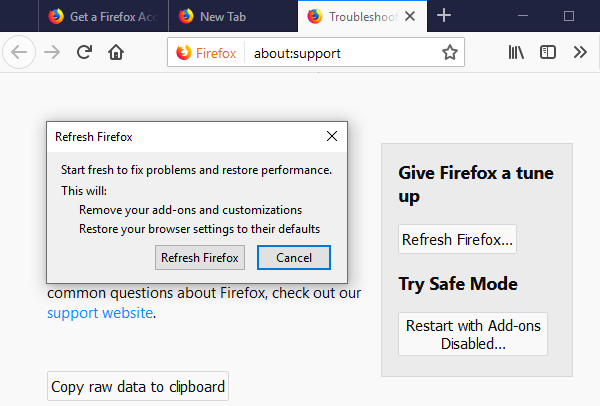
The next step is to confirm that really want to reset the Mozilla Firefox settings to its default by clicking on “Refresh Firefox” button.
Remove Malicious Extension from Safari
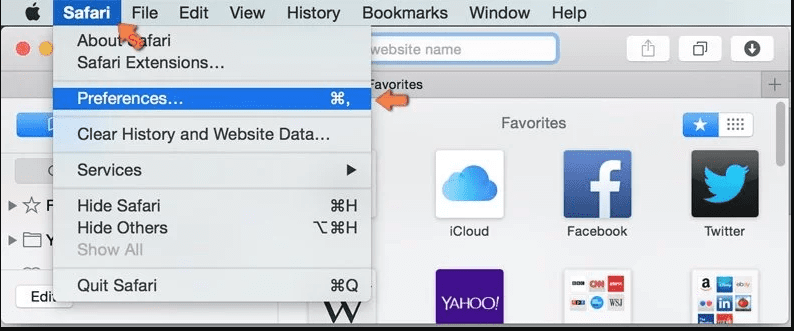
Open the Safari and go to its “Menu” and select “Preferences”.
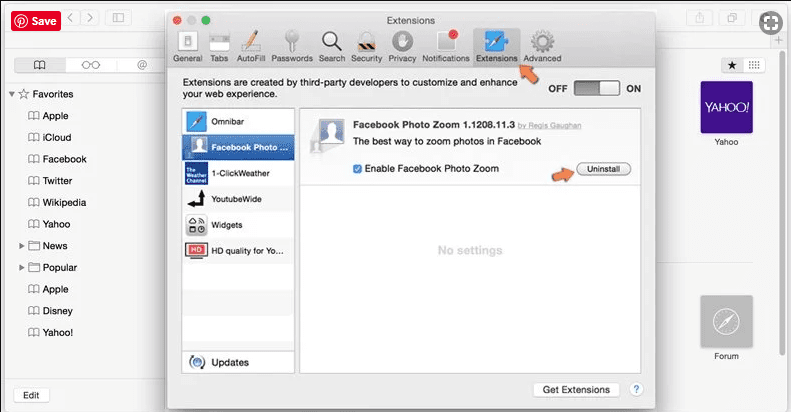
Click on the “Extension” and select all the recently installed “Extensions” and then click on “Uninstall”.
Optional Method
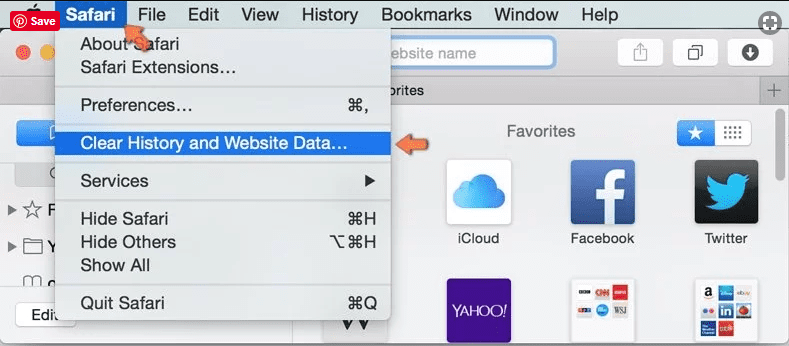
Open the “Safari” and go menu. In the drop-down menu, choose “Clear History and Website Data”.
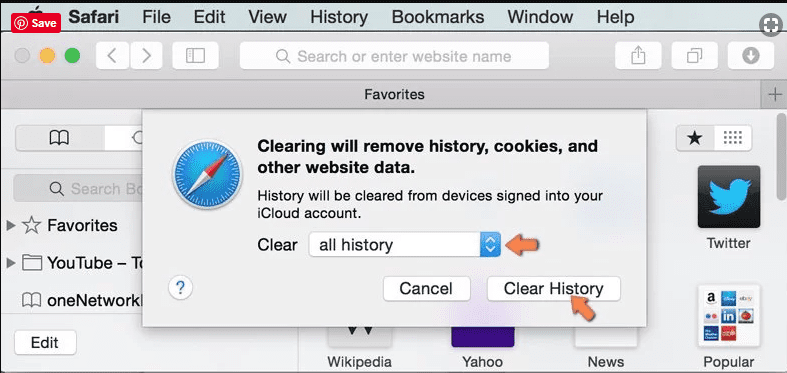
In the newly opened window, select “All History” and then press on “Clear History” option.
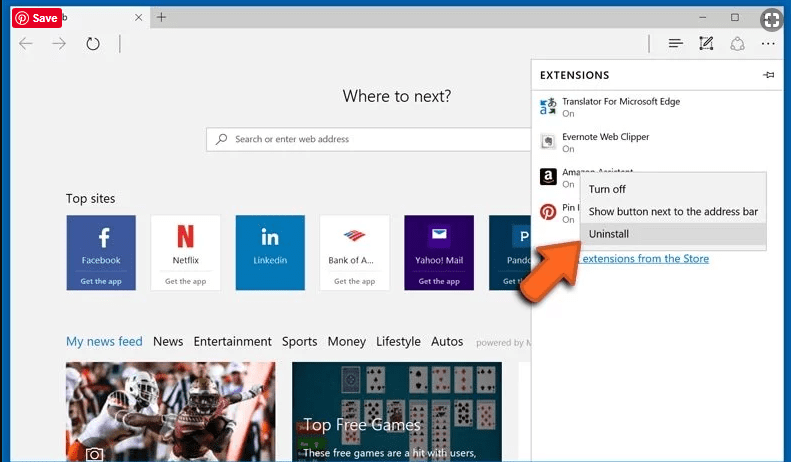
Delete Movie Finder (malicious add-ons) from Microsoft Edge
Open Microsoft Edge and go to three horizontal dot icons at the top right corner of the browser. Select all the recently installed extensions and right click on the mouse to “uninstall”
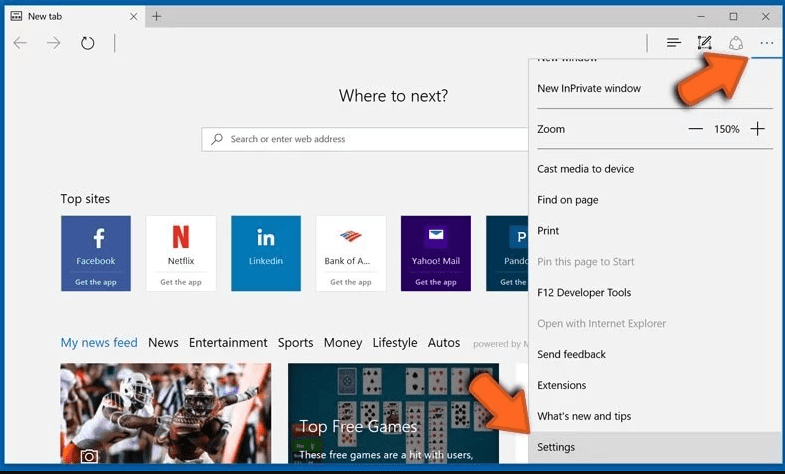
Optional Method
Open the browser (Microsoft Edge) and select “Settings”
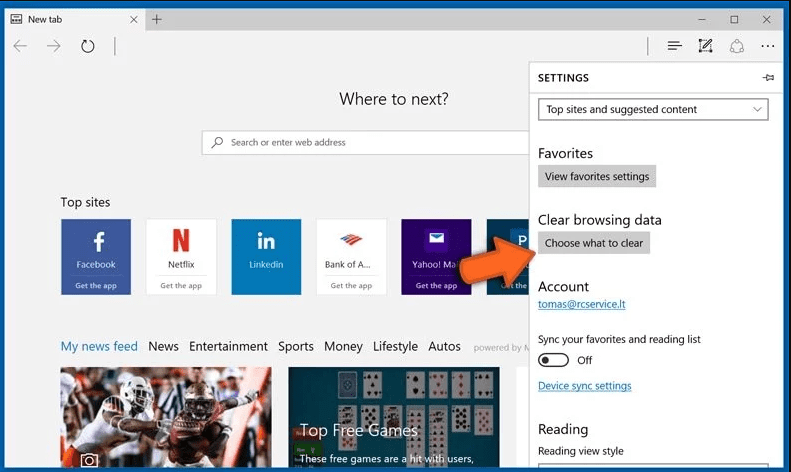
Next steps is to click on “Choose what to clear” button
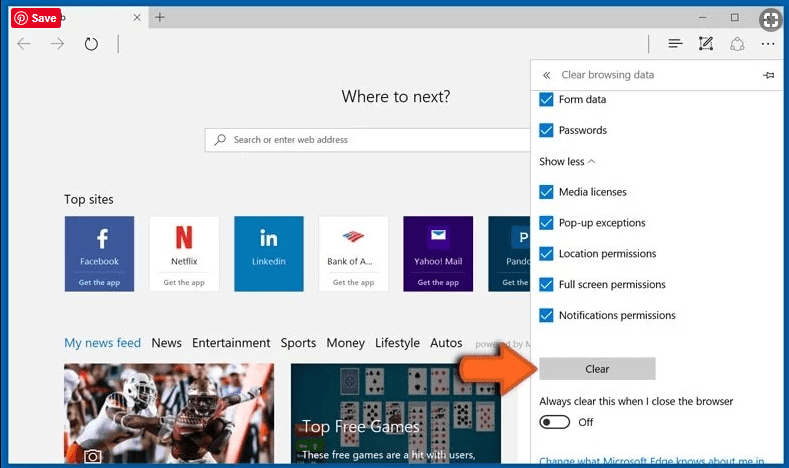
Click on “show more” and then select everything and then press on “Clear” button.
Conclusion
In most cases, the PUPs and adware gets inside the marked PC through unsafe freeware downloads. It is advised that you should only choose developers website only while downloading any kind of free applications. Choose custom or advanced installation process so that you can trace the additional PUPs listed for installation along with the main program.
Special Offer (For Windows)
Movie Finder can be creepy computer infection that may regain its presence again and again as it keeps its files hidden on computers. To accomplish a hassle free removal of this malware, we suggest you take a try with a powerful Spyhunter antimalware scanner to check if the program can help you getting rid of this virus.
Do make sure to read SpyHunter’s EULA, Threat Assessment Criteria, and Privacy Policy. Spyhunter free scanner downloaded just scans and detect present threats from computers and can remove them as well once, however it requires you to wiat for next 48 hours. If you intend to remove detected therats instantly, then you will have to buy its licenses version that will activate the software fully.
Special Offer (For Macintosh) If you are a Mac user and Movie Finder has affected it, then you can download free antimalware scanner for Mac here to check if the program works for you.