How to remove Ursnif virus
Complete Ursnif virus removal guide
Ursnif virus is a Trojan type infection that has the speciality in collecting banking and other personal information belongs to the naive users. It was released in 2006 and since then it has been seen a fair share of updates and is constantly returning with new campaigns for the propagation. Once installed, it launches malicious processes on the background in order to hide itself on the host machine for a long time. By running inside and continues doing various malicious activities, it may create the backdoor for other malicious malware injection.
However, the Ursnif virus mainly focuses on data tracking. It employs keylogging and other techniques to harvest the details like email accounts, user configurations as well as digital wallets. Later on, it sends these details to command and control server that is accessible to the attackers only. In 2015, this source-code was leaked. As a result of this, many cybercriminals was able to modify this malware that increases its capability. Now, this Trojan can operate more than just data tracking and so it can now be a highly evasive. Thus, if your device got an infection of Ursnif virus, you should consider removing it immediately.
Various data that the Trojan can record include the banking details, logins or passwords, web browsing activity, information about the victims’ OS and device and so on. Since the malware is constantly involving, it may possible that the threat can start targeting various financial institutions and more prominent organizations and can change the types of data it steals to. The latest version may cause the download/installation of various other malware such as Ransomware, Worm or Spyware to the already compromised advice. To sum up, the malware can create the huge risk of privacy, identity exposure financial loss and additionally to the system general PC performances. To prevent anything worst, immediately remove Ursnif virus from the device.
Spam email campaigns are used for malware distribution
Researchers always warn users that they should not believe anything on the Internet that looks too good to be true. That includes banner ads, in-text links and spam emails as well. Spam emails are however the most commonly used technique out of them. The developers hide malicious payload of the malware in an attachment file with the emails. When users click on them, they are asked to enable macros commands. One more click leads them into the malware installation to their device. You can avoid getting the intruder if you delete the spam emails that are not from companies you know or services you do not use. You should make ensure that those suspicious emails from the email box more frequently and try to scan the files before opening them. Pay attention to the processes and do not open an email if you do not expect of that.
Remove Ursnif virus
Manual malware removal guide is provided below in step by step manner. Follow it so that you will not find any trouble during removal process. You can use some reputable antivirus tool to automatically remove Ursnif virus from the device.
Special Offer (For Windows)
Ursnif virus can be creepy computer infection that may regain its presence again and again as it keeps its files hidden on computers. To accomplish a hassle free removal of this malware, we suggest you take a try with a powerful Spyhunter antimalware scanner to check if the program can help you getting rid of this virus.
Do make sure to read SpyHunter’s EULA, Threat Assessment Criteria, and Privacy Policy. Spyhunter free scanner downloaded just scans and detect present threats from computers and can remove them as well once, however it requires you to wiat for next 48 hours. If you intend to remove detected therats instantly, then you will have to buy its licenses version that will activate the software fully.
Special Offer (For Macintosh) If you are a Mac user and Ursnif virus has affected it, then you can download free antimalware scanner for Mac here to check if the program works for you.
Antimalware Details And User Guide
Click Here For Windows Click Here For Mac
Important Note: This malware asks you to enable the web browser notifications. So, before you go the manual removal process, execute these steps.
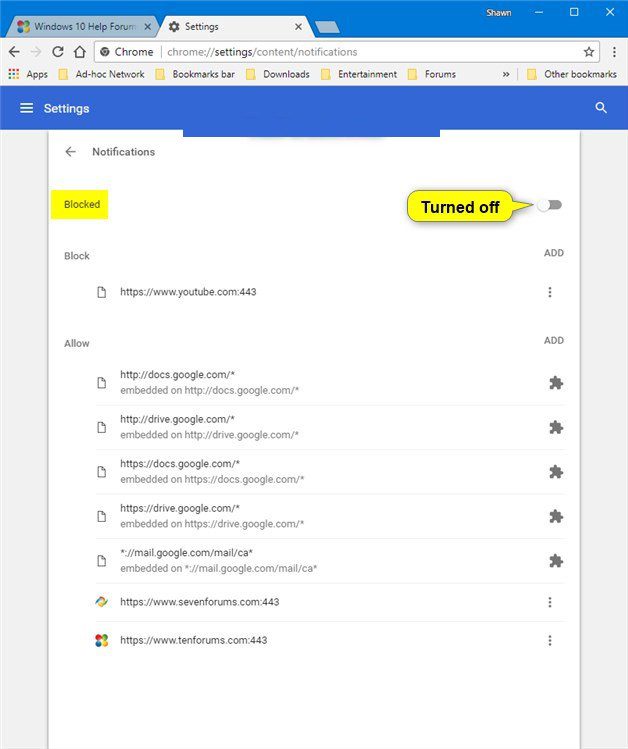
Google Chrome (PC)
- Go to right upper corner of the screen and click on three dots to open the Menu button
- Select “Settings”. Scroll the mouse downward to choose “Advanced” option
- Go to “Privacy and Security” section by scrolling downward and then select “Content settings” and then “Notification” option
- Find each suspicious URLs and click on three dots on the right side and choose “Block” or “Remove” option
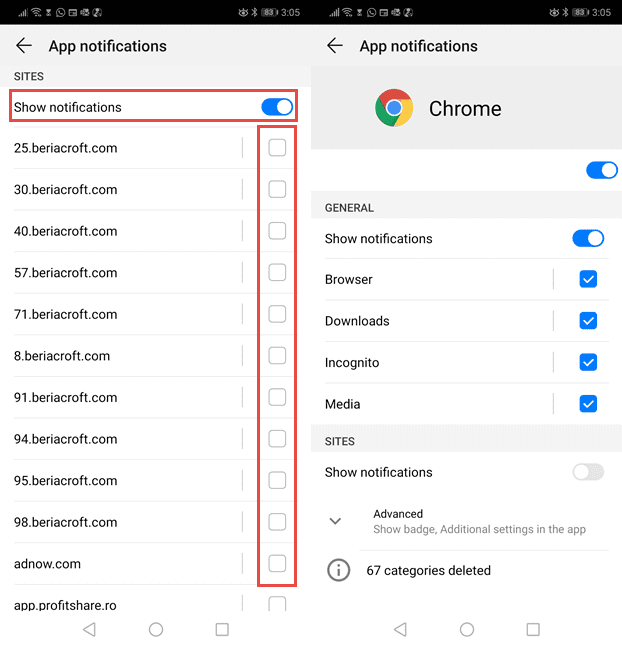
Google Chrome (Android)
- Go to right upper corner of the screen and click on three dots to open the menu button and then click on “Settings”
- Scroll down further to click on “site settings” and then press on “notifications” option
- In the newly opened window, choose each suspicious URLs one by one
- In the permission section, select “notification” and “Off” the toggle button
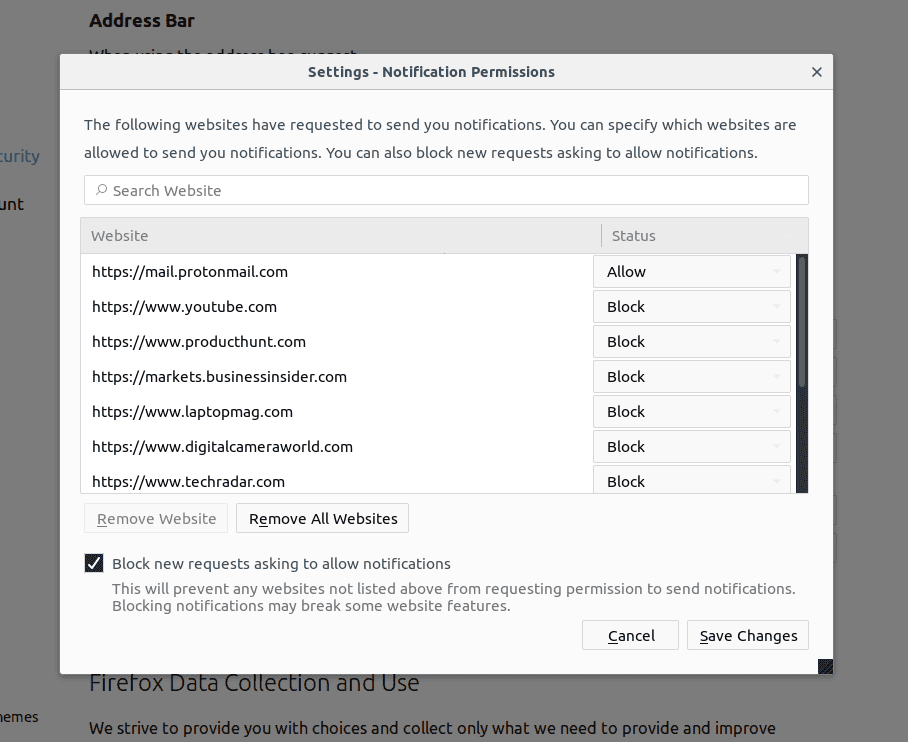
Mozilla Firefox
- On the right corner of the screen, you will notice three dots which is the “Menu” button
- Select “Options” and choose “Privacy and Security” in the toolbar present in the left side of the screen
- Slowly scroll down and go to “Permission” section then choose “Settings” option next to “Notifications”
- In the newly opened window, select all the suspicious URLs. Click on the drop-down menu and select “Block”
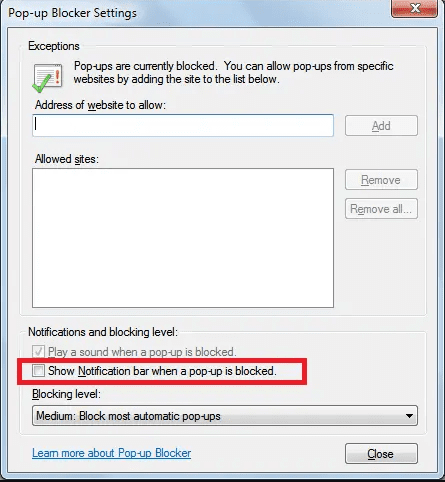
Internet Explorer
- In the Internet Explorer window, select the Gear button present on the right corner
- Choose “Internet Options”
- Select “Privacy” tab and then “Settings” under the “Pop-up Blocker” section
- Select all the suspicious URLs one by one and click on the “Remove” option
Microsoft Edge
- Open the Microsoft Edge and click on the three dots on the right corner of the screen to open the menu
- Scroll down and select “Settings”
- Scroll down further to choose “view advanced settings”
- In the “Website Permission” option, click on “Manage” option
- Click on switch under every suspicious URL
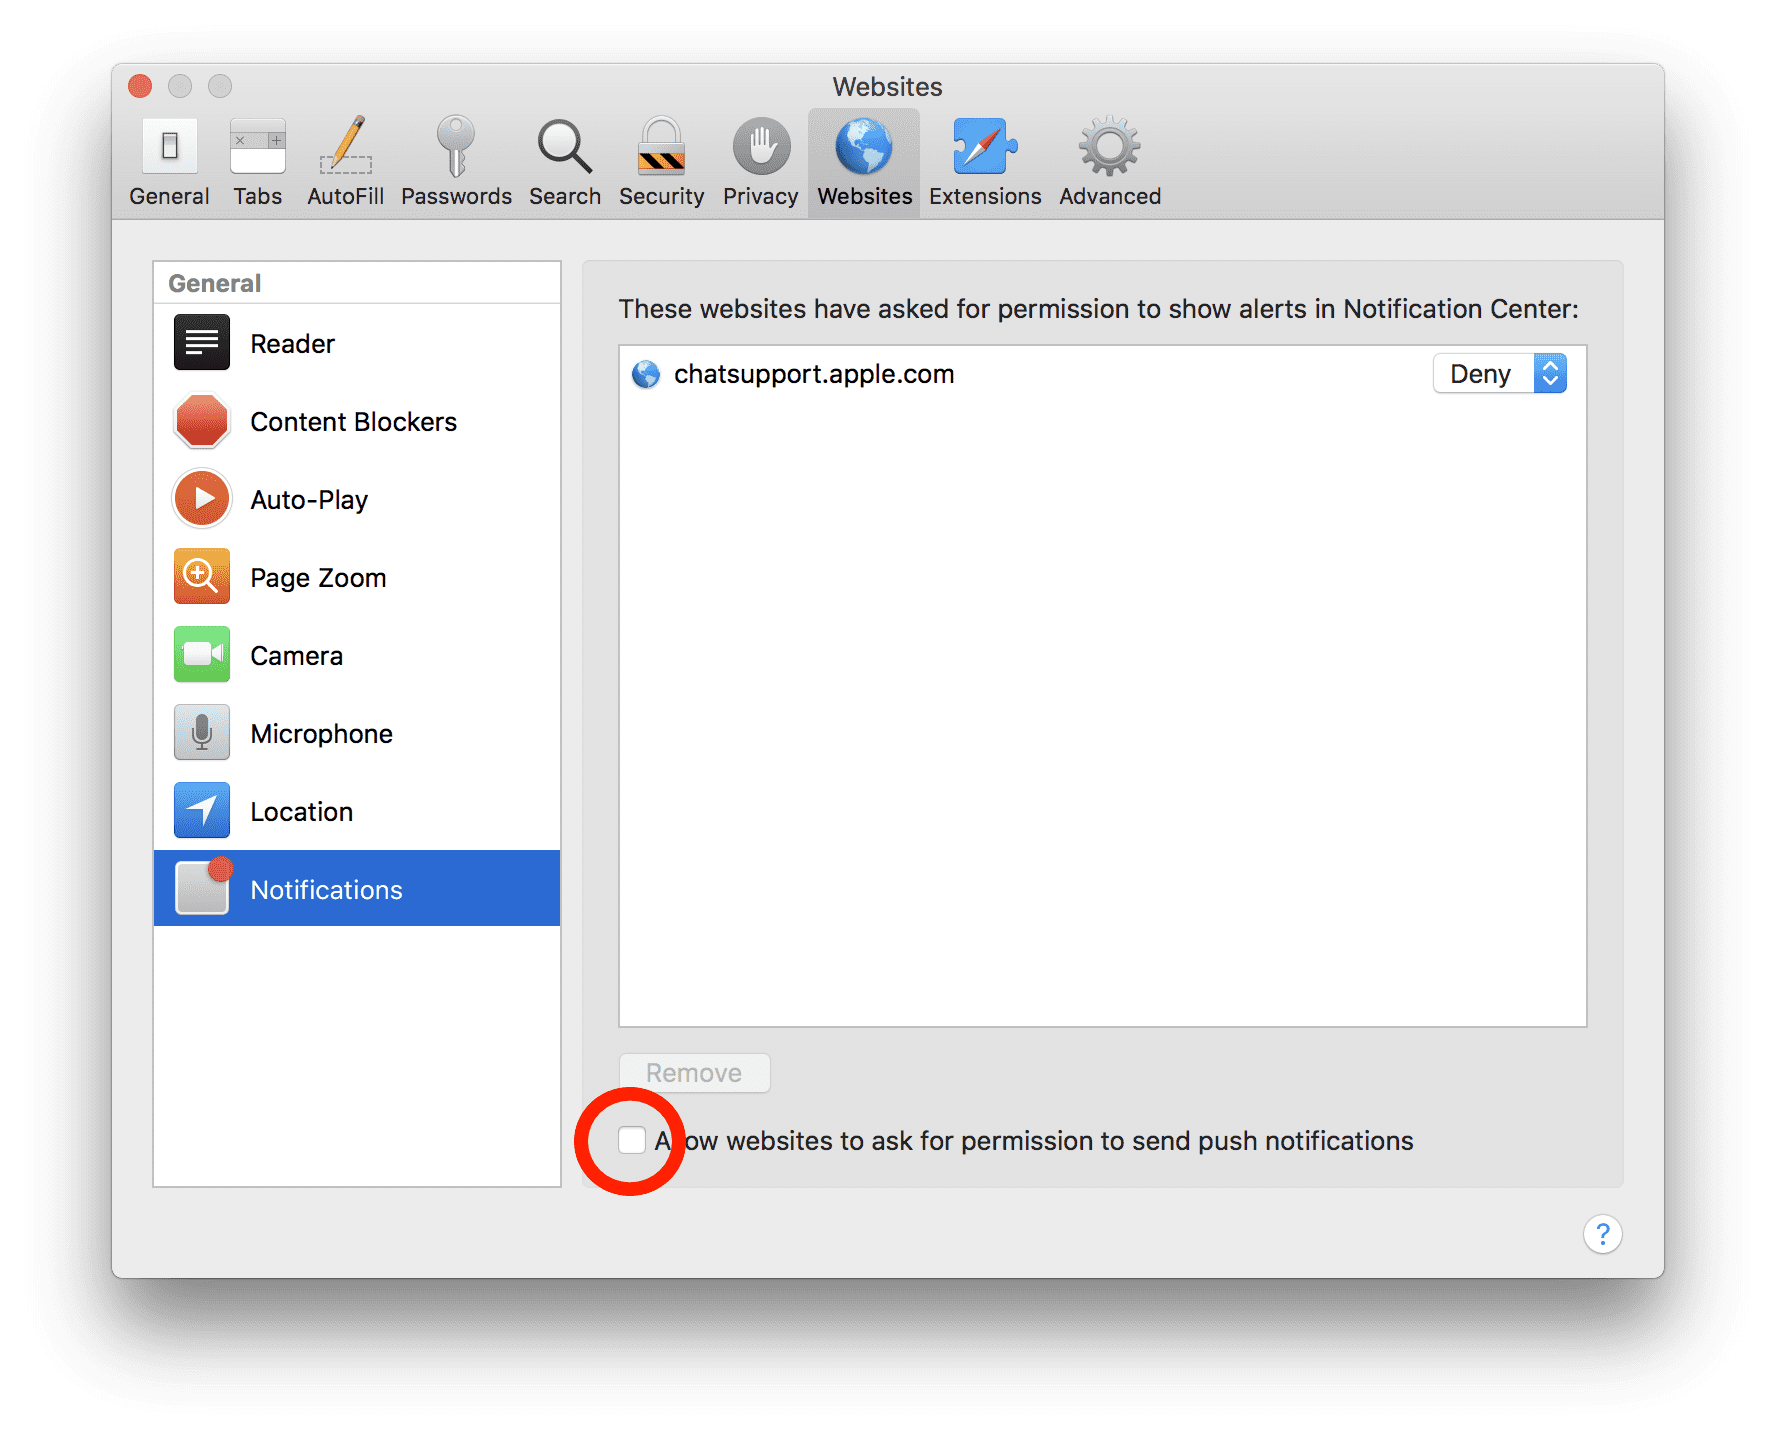
Safari (Mac):
- On the upper right side corner, click on “Safari” and then select “Preferences”
- Go to “website” tab and then choose “Notification” section on the left pane
- Search for the suspicious URLs and choose “Deny” option for each one of them
Manual Steps to Remove Ursnif virus:
Remove the related items of Ursnif virus using Control-Panel
Windows 7 Users
Click “Start” (the windows logo at the bottom left corner of the desktop screen), select “Control Panel”. Locate the “Programs” and then followed by clicking on “Uninstall Program”
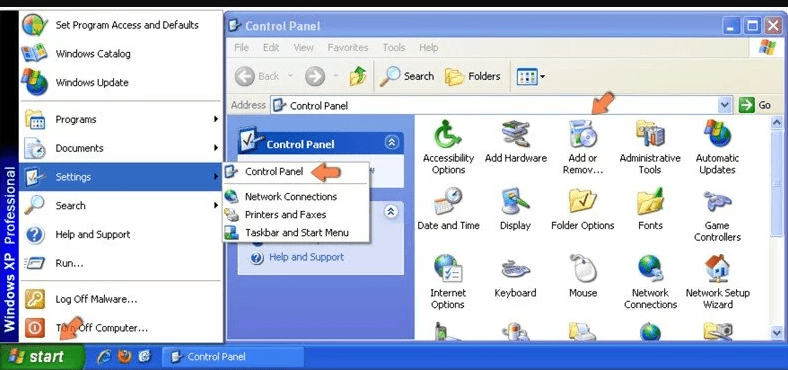
Windows XP Users
Click “Start” and then choose “Settings” and then click “Control Panel”. Search and click on “Add or Remove Program’ option
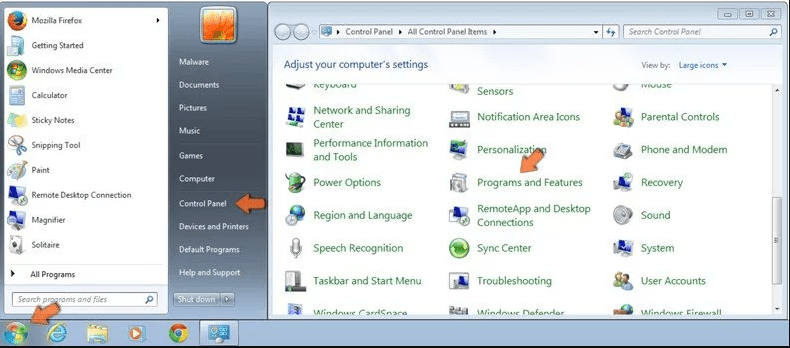
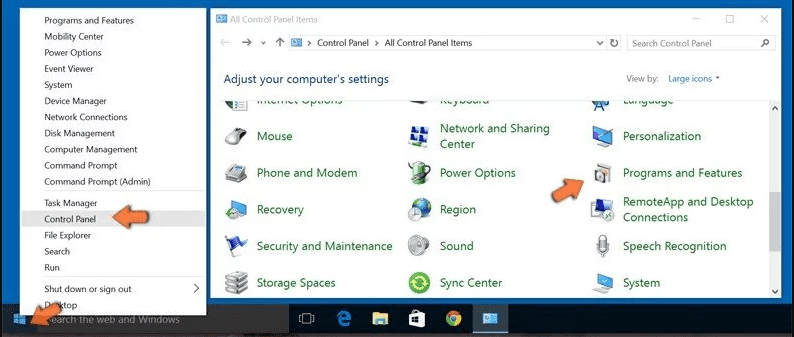
Windows 10 and 8 Users:
Go to the lower left corner of the screen and right-click. In the “Quick Access” menu, choose “Control Panel”. In the newly opened window, choose “Program and Features”
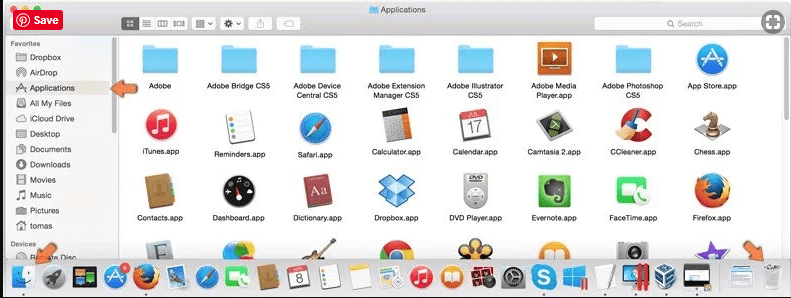
Mac OSX Users
Click on “Finder” option. Choose “Application” in the newly opened screen. In the “Application” folder, drag the app to “Trash”. Right click on the Trash icon and then click on “Empty Trash”.
In the uninstall programs window, search for the PUAs. Choose all the unwanted and suspicious entries and click on “Uninstall” or “Remove”.
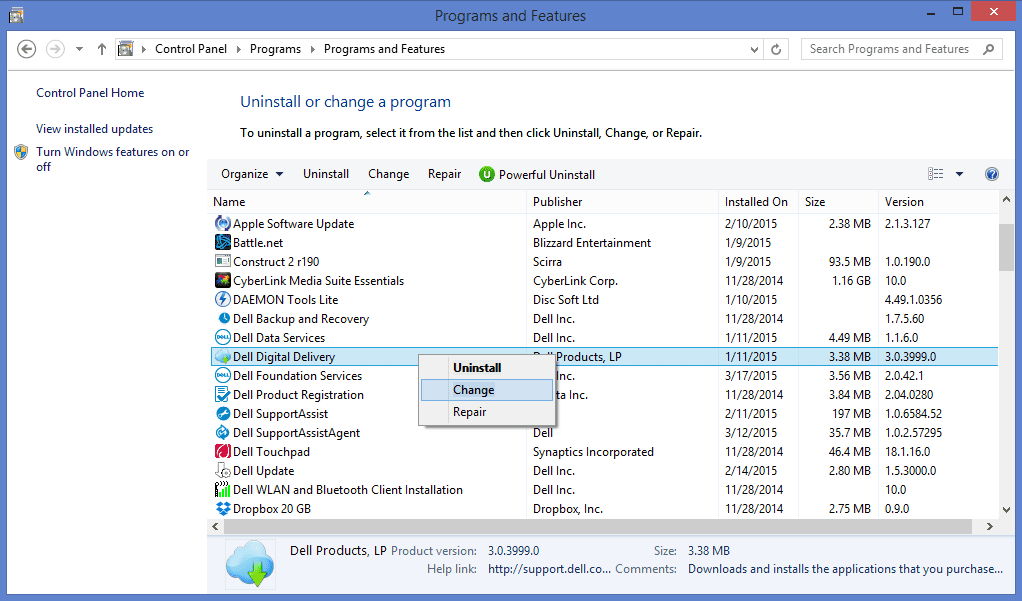
After you uninstall all the potentially unwanted program causing Ursnif virus issues, scan your computer with an anti-malware tool for any remaining PUPs and PUAs or possible malware infection. To scan the PC, use the recommended the anti-malware tool.
Special Offer (For Windows)
Ursnif virus can be creepy computer infection that may regain its presence again and again as it keeps its files hidden on computers. To accomplish a hassle free removal of this malware, we suggest you take a try with a powerful Spyhunter antimalware scanner to check if the program can help you getting rid of this virus.
Do make sure to read SpyHunter’s EULA, Threat Assessment Criteria, and Privacy Policy. Spyhunter free scanner downloaded just scans and detect present threats from computers and can remove them as well once, however it requires you to wiat for next 48 hours. If you intend to remove detected therats instantly, then you will have to buy its licenses version that will activate the software fully.
Special Offer (For Macintosh) If you are a Mac user and Ursnif virus has affected it, then you can download free antimalware scanner for Mac here to check if the program works for you.
How to Remove Adware (Ursnif virus) from Internet Browsers
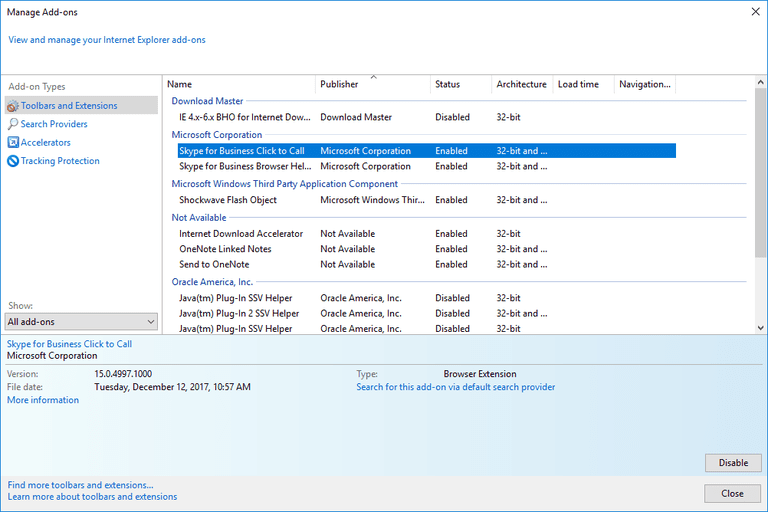
Delete malicious add-ons and extensions from IE
Click on the gear icon at the top right corner of Internet Explorer. Select “Manage Add-ons”. Search for any recently installed plug-ins or add-ons and click on “Remove”.
Additional Option
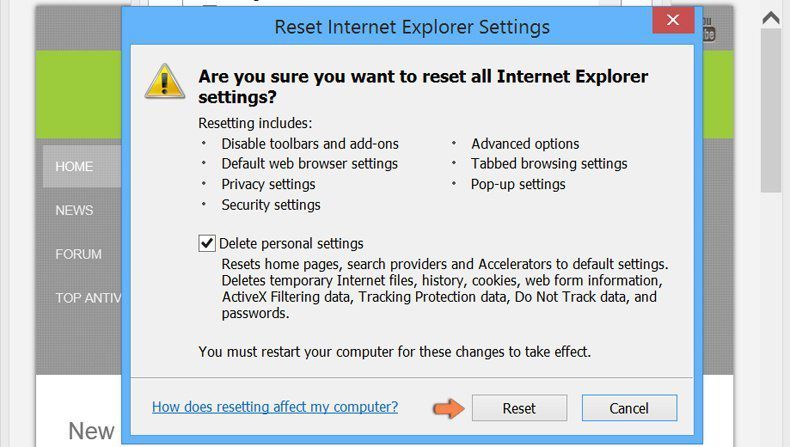
If you still face issues related to Ursnif virus removal, you can reset the Internet Explorer to its default setting.
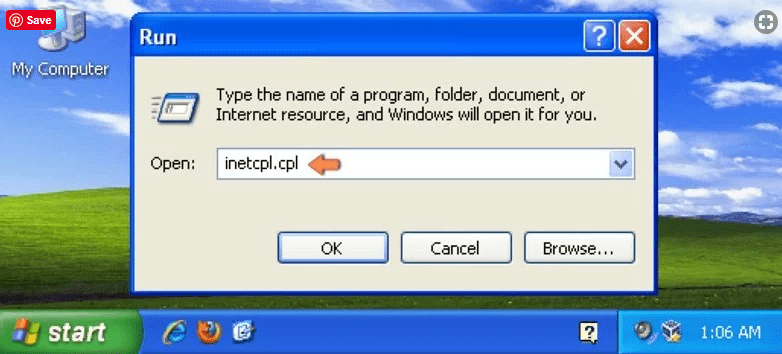
Windows XP users: Press on “Start” and click “Run”. In the newly opened window, type “inetcpl.cpl” and click on the “Advanced” tab and then press on “Reset”.
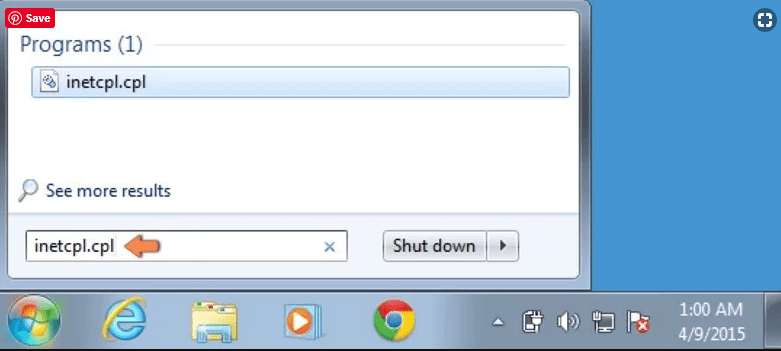
Windows Vista and Windows 7 Users: Press the Windows logo, type inetcpl.cpl in the start search box and press enter. In the newly opened window, click on the “Advanced Tab” followed by “Reset” button.
For Windows 8 Users: Open IE and click on the “gear” icon. Choose “Internet Options”
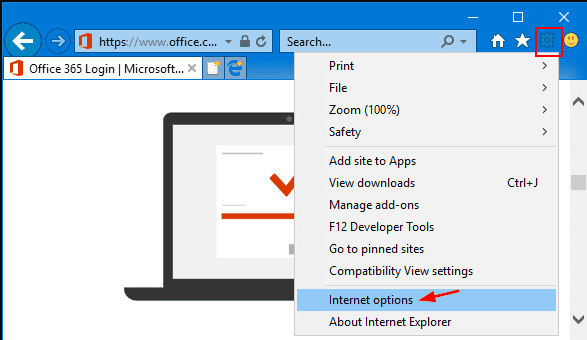
Select the “Advanced” tab in the newly opened window
Press on “Reset” option
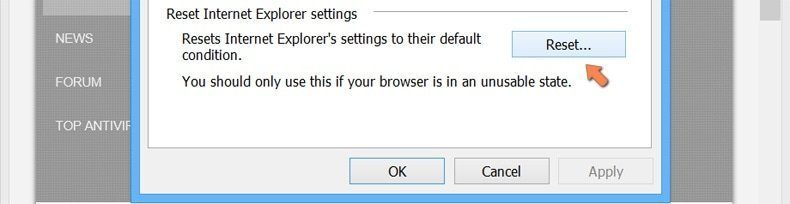
You have to press on the “Reset” button again to confirm that you really want to reset the IE
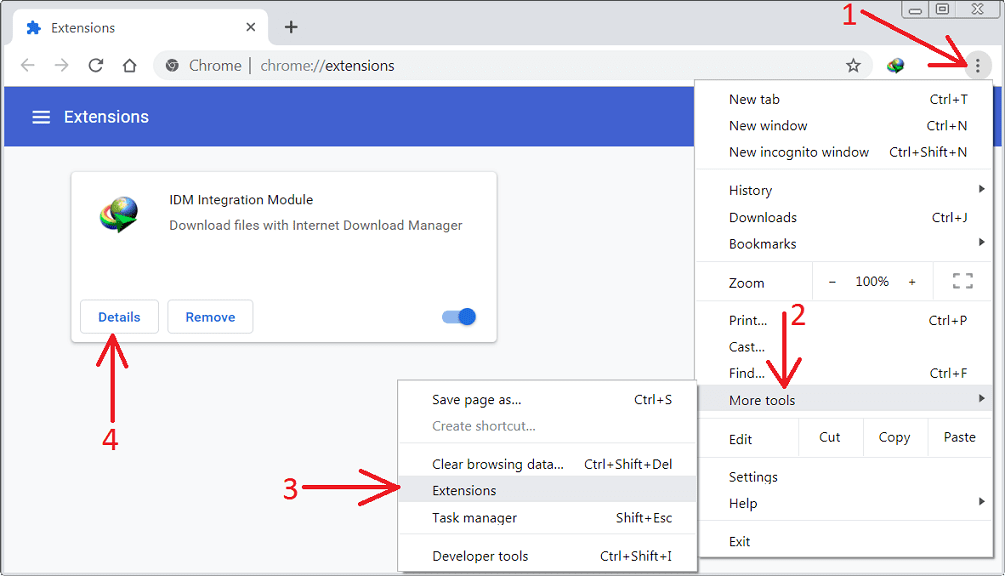
Remove Doubtful and Harmful Extension from Google Chrome
Go to menu of Google Chrome by pressing on three vertical dots and select on “More tools” and then “Extensions”. You can search for all the recently installed add-ons and remove all of them.
Optional Method
If the problems related to Ursnif virus still persists or you face any issue in removing, then it is advised that your reset the Google Chrome browse settings. Go to three dotted points at the top right corner and choose “Settings”. Scroll down bottom and click on “Advanced”.
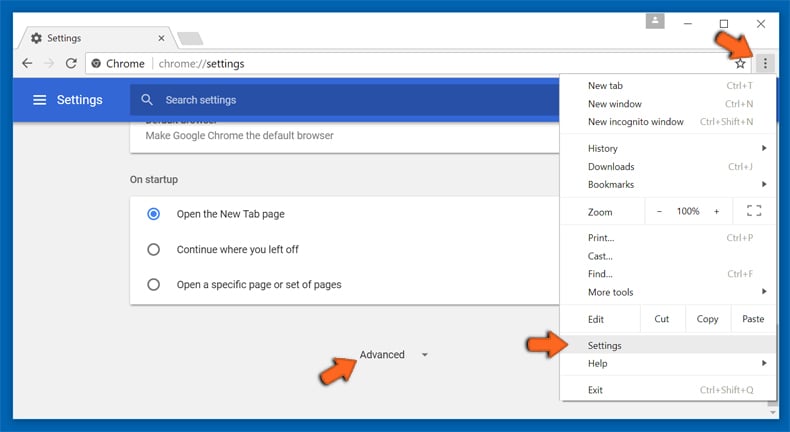
At the bottom, notice the “Reset” option and click on it.
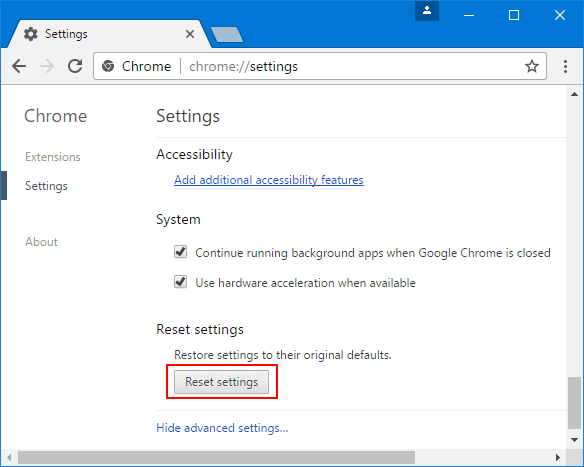
In the next opened window, confirm that you want to reset the Google Chrome settings by click on the “Reset” button.

Remove Ursnif virus plugins (including all other doubtful plug-ins) from Firefox Mozilla
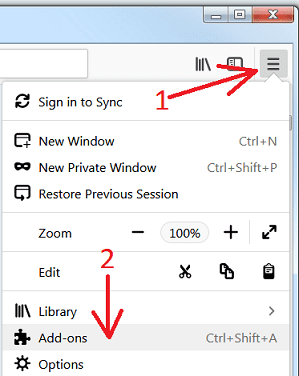
Open the Firefox menu and select “Add-ons”. Click “Extensions”. Select all the recently installed browser plug-ins.
Optional Method
If you face problems in Ursnif virus removal then you have the option to rese the settings of Mozilla Firefox.
Open the browser (Mozilla Firefox) and click on the “menu” and then click on “Help”.
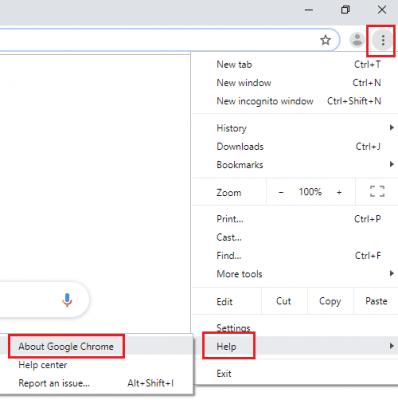
Choose “Troubleshooting Information”
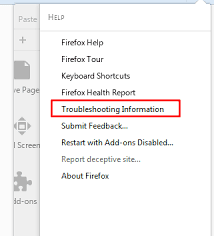
In the newly opened pop-up window, click “Refresh Firefox” button
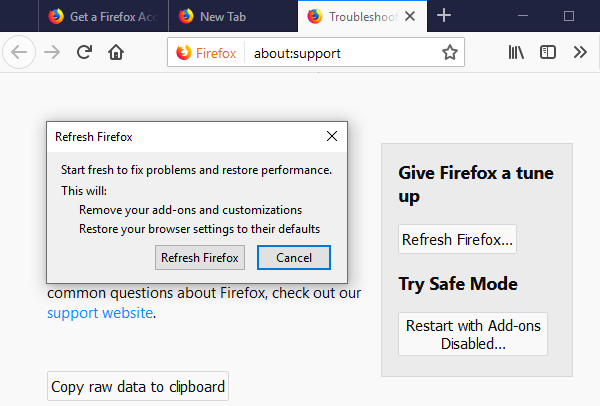
The next step is to confirm that really want to reset the Mozilla Firefox settings to its default by clicking on “Refresh Firefox” button.
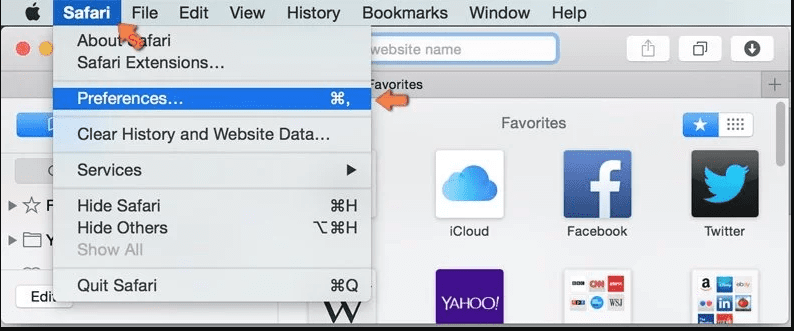
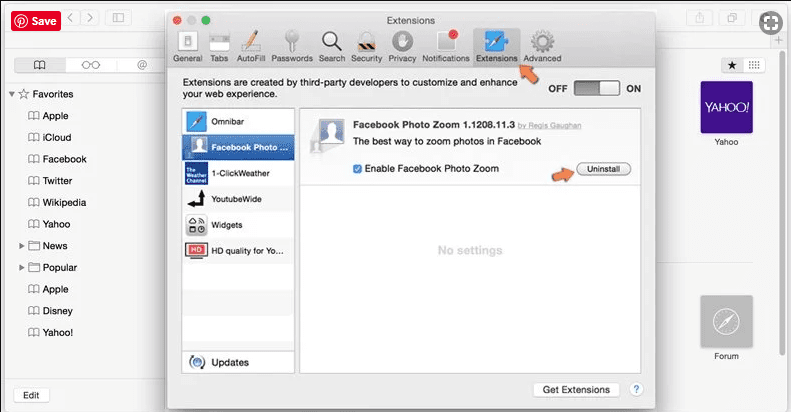
Remove Malicious Extension from Safari
Open the Safari and go to its “Menu” and select “Preferences”.
Click on the “Extension” and select all the recently installed “Extensions” and then click on “Uninstall”.
Optional Method
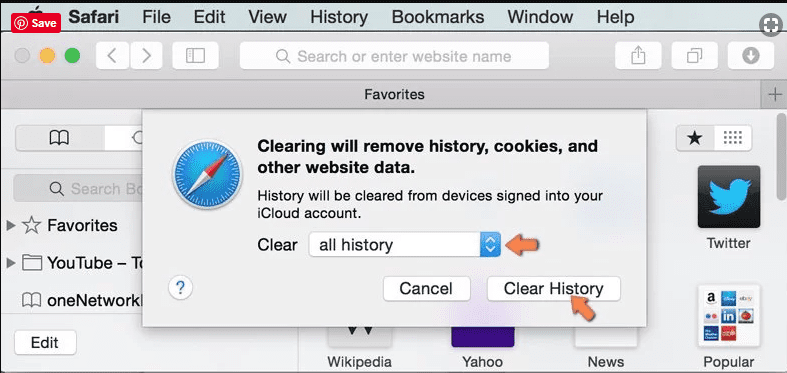
Open the “Safari” and go menu. In the drop-down menu, choose “Clear History and Website Data”.
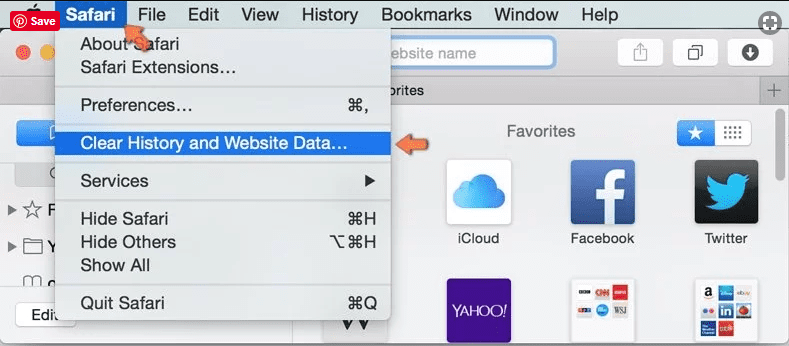
In the newly opened window, select “All History” and then press on “Clear History” option.
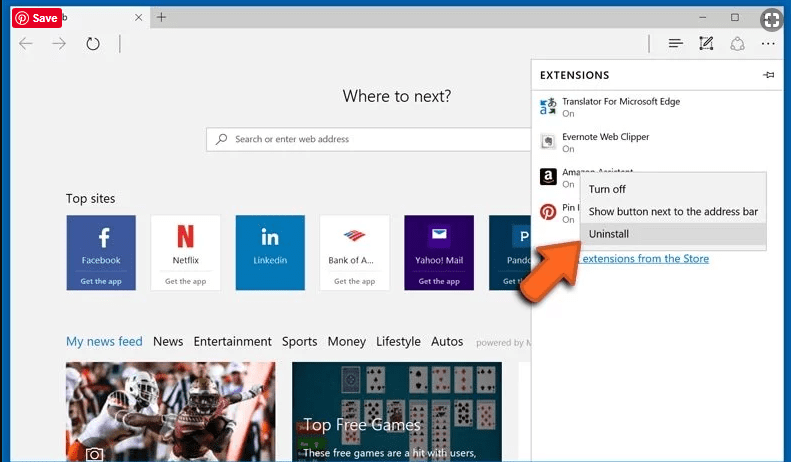
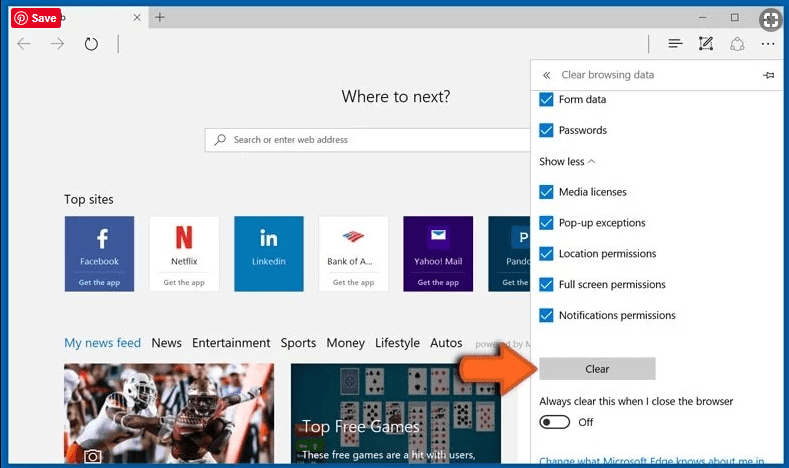
Delete Ursnif virus (malicious add-ons) from Microsoft Edge
Open Microsoft Edge and go to three horizontal dot icons at the top right corner of the browser. Select all the recently installed extensions and right click on the mouse to “uninstall”
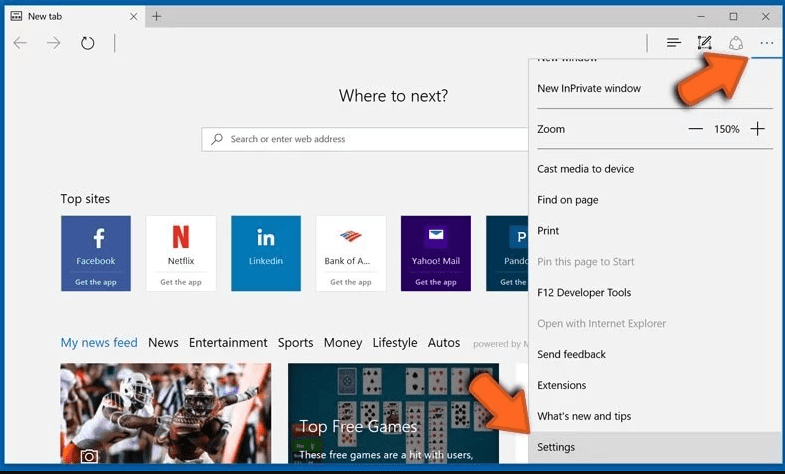
Optional Method
Open the browser (Microsoft Edge) and select “Settings”
Next steps is to click on “Choose what to clear” button
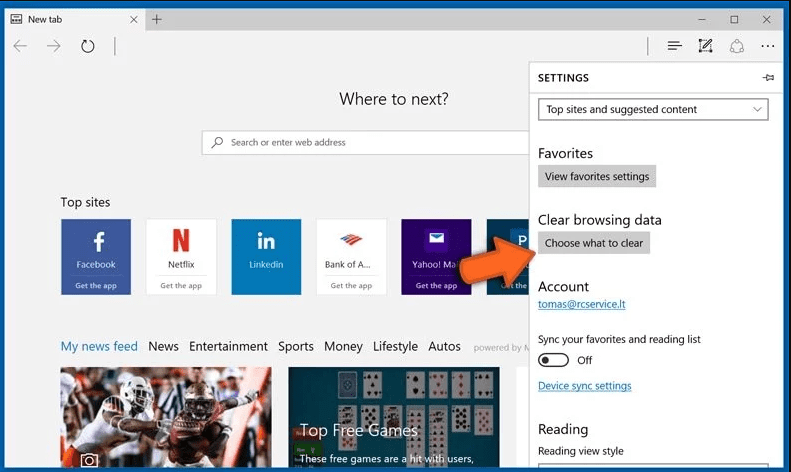
Click on “show more” and then select everything and then press on “Clear” button.
Conclusion
In most cases, the PUPs and adware gets inside the marked PC through unsafe freeware downloads. It is advised that you should only choose developers website only while downloading any kind of free applications. Choose custom or advanced installation process so that you can trace the additional PUPs listed for installation along with the main program.
Special Offer (For Windows)
Ursnif virus can be creepy computer infection that may regain its presence again and again as it keeps its files hidden on computers. To accomplish a hassle free removal of this malware, we suggest you take a try with a powerful Spyhunter antimalware scanner to check if the program can help you getting rid of this virus.
Do make sure to read SpyHunter’s EULA, Threat Assessment Criteria, and Privacy Policy. Spyhunter free scanner downloaded just scans and detect present threats from computers and can remove them as well once, however it requires you to wiat for next 48 hours. If you intend to remove detected therats instantly, then you will have to buy its licenses version that will activate the software fully.
Special Offer (For Macintosh) If you are a Mac user and Ursnif virus has affected it, then you can download free antimalware scanner for Mac here to check if the program works for you.