How To Remove .gsed file virus And Restore Infected Files
Complete Guideline To Delete .gsed file virus From PC
.gsed file virus is a kind of highly dangerous malware infection that is programmed to encrypt the files that users store on their PC systems and ask them to pay a sum of ransom for their decryption. The data lock-down caused by this hazardous ransomware is enough to create a lot of trouble for you, especially if you need the files that have been encoded and don’t have backups to access them. This perilous crypt-threat uses a sophisticated encryption algorithm to encrypt different types of data such as images, videos, audios, documents, archives and so on and even changes their extension by adding “.gsed” at the end of their names.
After completing the encryption process. .gsed file virus asks users to buy the decryption tool to get back access to the locked files that is kept on attackers’ server. It puts a ransom note on each folder that contains the compromised files and also changes the desktop’s wallpaper with another images that includes ransom demanding message. Crooks generally demand $200 to $1000 as ransom amount that has to be paid in BitCoins or any other digital currency.
Should You Pay The Ransom?
Although, it is true that files locked by .gsed file virus can not be opened without using the decryption software but still, we highly advise to not deal with the hackers. Remember, it has been tendency of such criminals that they often disappear after taking the ransom or provide rogue application to the victims in the name of decryption tool which only harms the machine upon getting installed. Moreover, even of they deliver the decryption software that works, the virus will still remain in the PC and can strike again for further revenues. And hence, never trust on the hackers under any circumstance and try to remove .gsed file virus from the PC as early as possible. To restore the compromised data, use a genuine third-party file-recovery program or if you have a backup made on any external drive, you can easily recover them back.
How Does This Crypto-virus Get Into Your System?
There are several deceptive methods to spread this dangerous malware. Some of them are:
- Spam email campaign
- Freeware downloads
- Rig exploit kit or Trojan
- Hacked sites
- Managed Service Provider hacks
Tips To Prevent The Computer From Such Attacks:
In order to keep your device away from such notorious attacks, you need to be careful while surfing the web. Ignore suspicious mails that come from unknown sender and never open their vicious attachments. Avoid visiting gambling, torrent or other harmful web portals and never use an infected removal drives. Moreover, always choose Custom/Advanced configuration settings to install a third-party application and use a reputable anti-malware program.
Threat Summary
Name- .gsed file virus
Type- Ransomware, Crypto-virus
Extension- “.gsed”
Description- Destructive malware which tends to encrypt users’ crucial files and then ask them to pay off for the decryption key.
Symptoms- All of your important files and data are locked and can’t be opened without using a private key.
Distribution-Spam email campaigns, Executable files etc.
Damage- Causes permanent data loss and can also drop other pernicious infections onto the compromised device.
Removal- Manual and automatic guidelines as provided under this article
Other Harmful Properties of .gsed file virus:
Once .gsed file virus gets inside your PC, it makes various unwanted modifications to the system settings before it starts the file encoding. It ruins important system files, deletes shadow volume copies, deactivates Windows repair function, connects to a remote server by using a number of domains and rises its privileges, that is quite exceptional ransomware-kind viruses. And therefore, it is necessary to remove .gsed file virus from the machine immediately by following the effective removal steps given below.
Special Offer (For Windows)
.gsed file virus can be creepy computer infection that may regain its presence again and again as it keeps its files hidden on computers. To accomplish a hassle free removal of this malware, we suggest you take a try with a powerful Spyhunter antimalware scanner to check if the program can help you getting rid of this virus.
Do make sure to read SpyHunter’s EULA, Threat Assessment Criteria, and Privacy Policy. Spyhunter free scanner downloaded just scans and detect present threats from computers and can remove them as well once, however it requires you to wiat for next 48 hours. If you intend to remove detected therats instantly, then you will have to buy its licenses version that will activate the software fully.
Data Recovery Offer
We Suggest you to choose your lately created backup files in order to restore your encrypted files, however in case if you don’t have any such backups, you can try a data recovery tool to check if you can restore your lost data.
Antimalware Details And User Guide
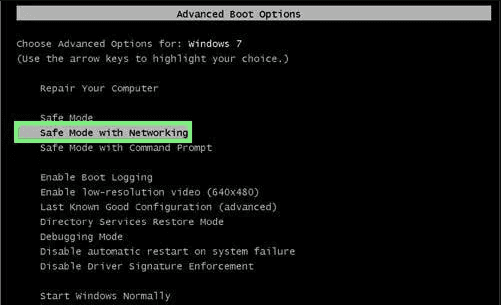
Step 1: Remove .gsed file virus through “Safe Mode with Networking”
Step 2: Delete .gsed file virus using “System Restore”
Step 1: Remove .gsed file virus through “Safe Mode with Networking”
For Windows XP and Windows 7 users: Boot the PC in “Safe Mode”. Click on “Start” option and continuously press on F8 during the start process until the “Windows Advanced Option” menu appears on the screen. Choose “Safe Mode with Networking” from the list.
Now, a windows homescreen appears on the desktop and work-station is now working on “Safe mode with networking”.
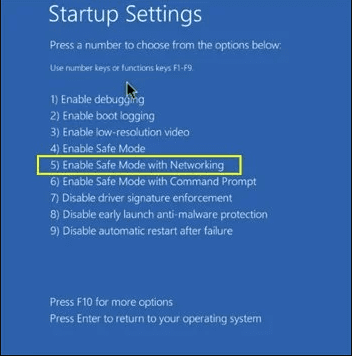
For Windows 8 Users: Go to the “Start Screen”. In the search results select settings, type “Advanced”. In the “General PC Settings” option, choose “Advanced startup” option. Again, click on the “Restart Now” option. The work-station boots to “Advanced Startup Option Menu”. Press on “Troubleshoot” and then “Advanced options” button. In the “Advanced Option Screen”, press on “Startup Settings”. Again, click on “Restart” button. The work-station will now restart in to the “Startup Setting” screen. Next is to press F5 to boot in Safe Mode in Networking.
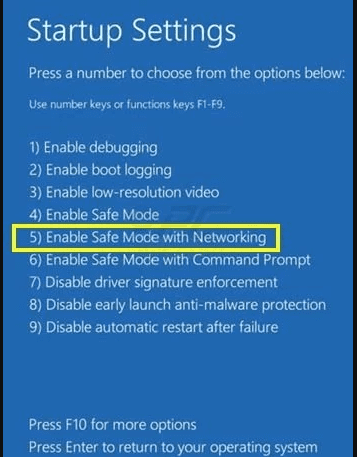
For Windows 10 Users: Press on Windows logo and on the “Power” icon. In the newly opened menu, choose “Restart” while continuously holding “Shift” button on the keyboard. In the new open “Choose an option” window, click on “Troubleshoot” and then on the “Advanced Options”. Select “Startup Settings” and press on “Restart”. In the next window, click on “F5” button on the key-board.
Step 2: Delete .gsed file virus using “System Restore”
Log-in to the account infected with .gsed file virus. Open the browser and download a legitimate anti-malware tool. Do a full System scanning. Remove all the malicious detected entries.
Special Offer (For Windows)
.gsed file virus can be creepy computer infection that may regain its presence again and again as it keeps its files hidden on computers. To accomplish a hassle free removal of this malware, we suggest you take a try with a powerful Spyhunter antimalware scanner to check if the program can help you getting rid of this virus.
Do make sure to read SpyHunter’s EULA, Threat Assessment Criteria, and Privacy Policy. Spyhunter free scanner downloaded just scans and detect present threats from computers and can remove them as well once, however it requires you to wiat for next 48 hours. If you intend to remove detected therats instantly, then you will have to buy its licenses version that will activate the software fully.
Data Recovery Offer
We Suggest you to choose your lately created backup files in order to restore your encrypted files, however in case if you don’t have any such backups, you can try a data recovery tool to check if you can restore your lost data.
In case if you cannot start the PC in “Safe Mode with Networking”, Try using “System Restore”
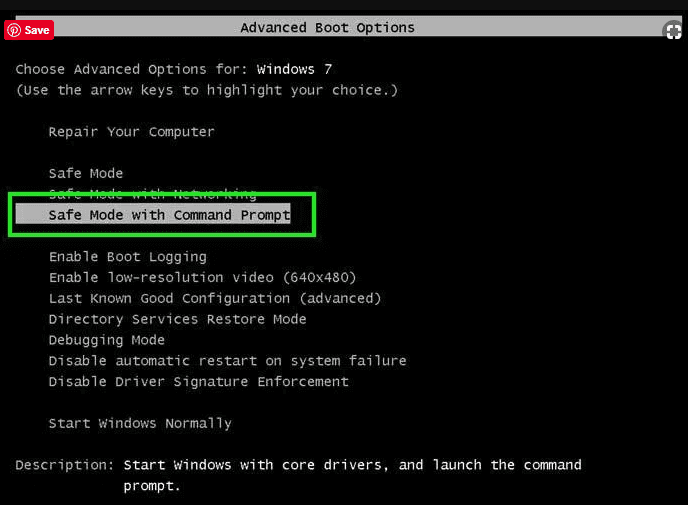
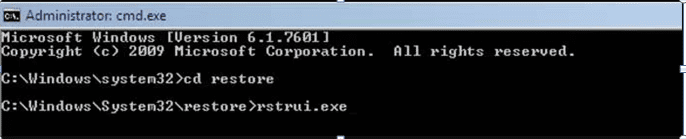
- During the “Startup”, continuously press on F8 key until the “Advanced Option” menu appears. From the list, choose “Safe Mode with Command Prompt” and then press “Enter”
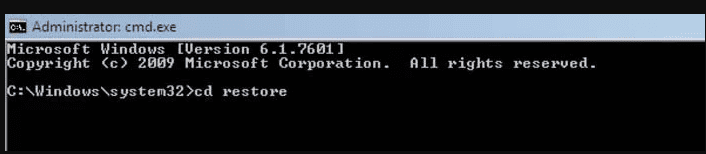
- In the new opened command prompt, enter “cd restore” and then press “Enter”.
- Type: rstrui.exe and Press “ENTER”
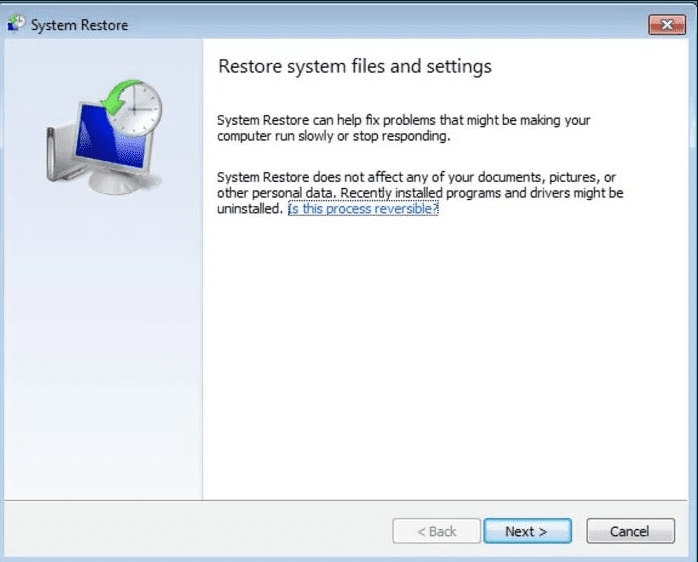
- Click “Next” on the new windows
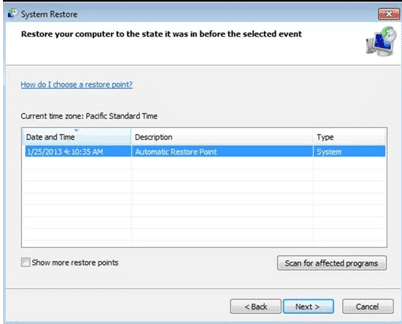
- Choose any of the “Restore Points” and click on “Next”. (This step will restore the work-station to its earlier time and date prior to .gsed file virus infiltration in the PC.
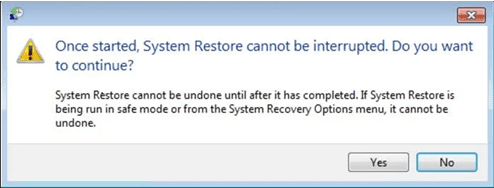
- In the newly opened windows, press on “Yes”.
Once your PC gets restored to its previous date and time, download the recommended anti-malware tool and perform a deep scanning in order to remove .gsed file virus files if they left in the work-station.
In order to restore the each (separate) file by this ransomware, use “Windows Previous Version” feature. This method is effective when “System Restore Function” is enabled in the work-station.
Important Note: Some variants of .gsed file virus delete the “Shadow Volume Copies” as well hence this feature may not work all the time and is applicable for selective computers only.
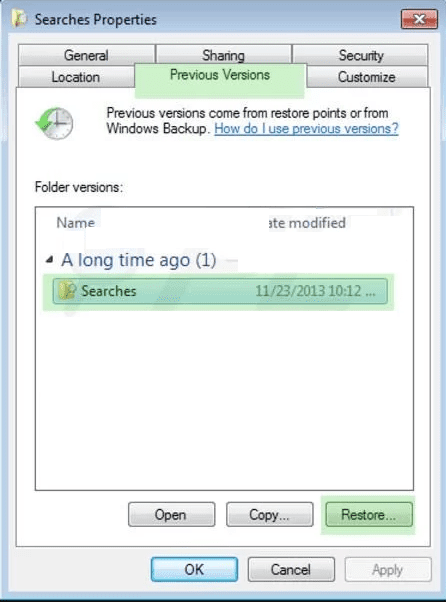
How to Restore Individual Encrypted File:
In order to restore a single file, right click on it and go to “Properties”. Select “Previous Version” tab. Select a “Restore Point” and click on “Restore” option.
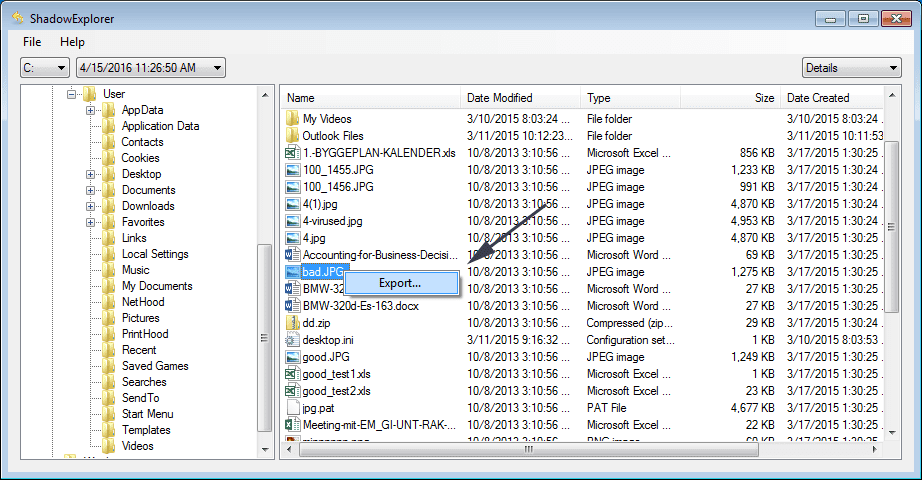
In order to access the files encrypted by .gsed file virus, you can also try using “Shadow Explorer”. In order to get more information on this application, press here.
Important: Data Encryption Ransomware are highly dangerous and it is always better that you take precautions to avoid its attack on your work-station. It is advised to use a powerful anti-malware tool in order to get protection in real-time. With this help of “SpyHunter”, “group policy objects” are implanted in the registries in order to block harmful infections like .gsed file virus.
Also, In Windows 10, you get a very unique feature called “Fall Creators Update” that offer “Controlled Folder Access” feature in order to block any kind of encryption to the files. With the help of this feature, any files stored in the locations such as “Documents”, “Pictures”, “Music”, “Videos”, “Favorites” and “Desktop” folders are safe by default.
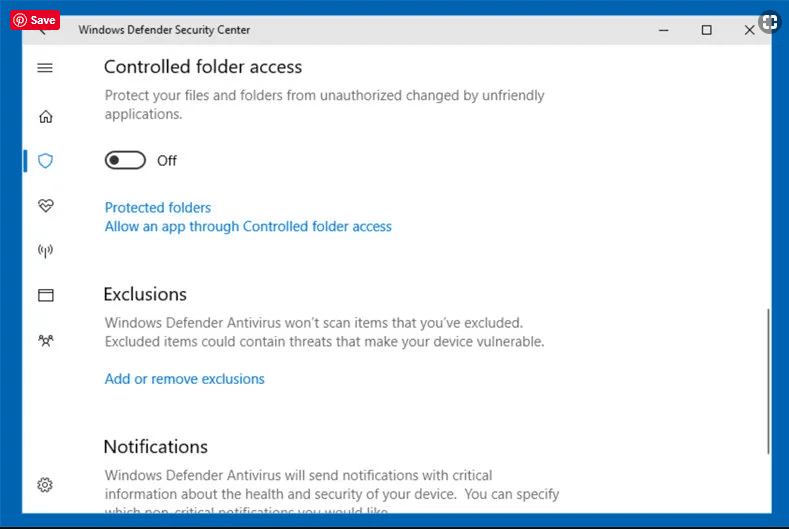
It is very important that you install this “Windows 10 Fall Creators Update” in your PC to protect your important files and data from ransomware encryption. The more information on how to get this update and add an additional protection form rnasomware attack has been discussed here.
How to Recover the Files Encrypted by .gsed file virus?
Till now, you would have understood that what had happed to your personal files that got encrypted and how you can remove the scripts and payloads associated with .gsed file virus in order to protect your personal files that has not been damaged or encrypted until now. In order to retrieve the locked files, the depth information related to “System Restore” and “Shadow Volume Copies” has already been discussed earlier. However, in case if you are still unable to access the encrypted files then you can try using a data recovery tool.
Use of Data Recovery Tool
This step is for all those victims who have already tries all the above mentioned process but didn’t find any solution. Also it is important that you are able to access the PC and can install any software. The data recovery tool works on the basis of System scanning and recovery algorithm. It searches the System partitions in order to locate the original files which were deleted, corrupted or damaged by the malware. Remember that you must not re-install the Windows OS otherwise the “previous” copies will get deleted permanently. You have to clean the work-station at first and remove .gsed file virus infection. Leave the locked files as it is and follow the steps mentioned below.
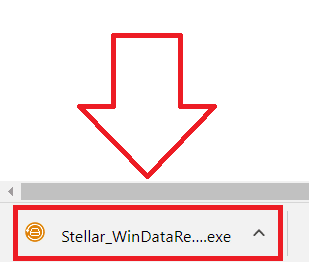
Step1: Download the software in the work-station by clicking on the “Download” button below.

Step2: Execute the installer by clicking on downloaded files.
Step3: A license agreement page appears on the screen. Click on “Accept” to agree with its terms and use. Follow the on-screen instruction as mentioned and click on “Finish” button.

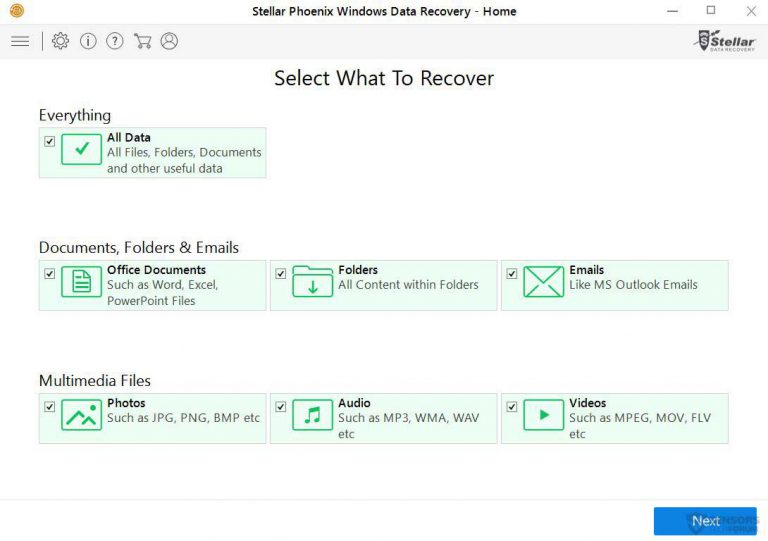
Step4: Once the installation gets completed, the program gets executed automatically. In the newly opened interface, select the file types that you want to recover and click on “Next”.
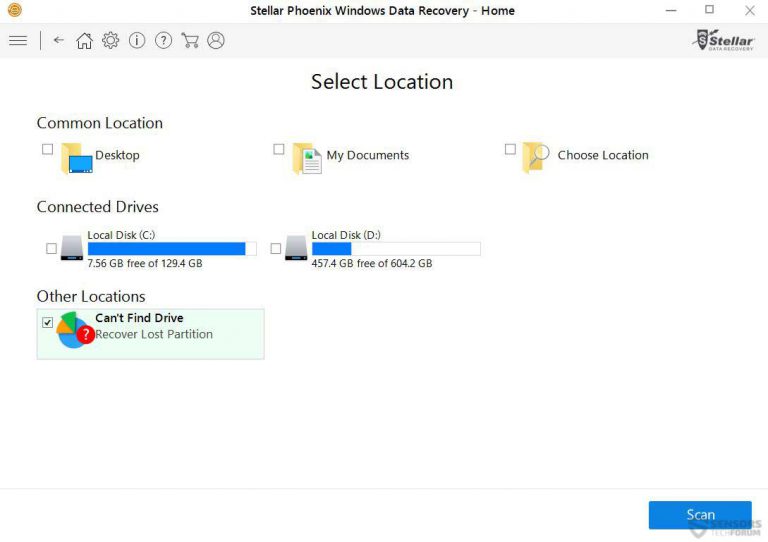
Step5: You can select the “Drives” on which you want the software to run and execute the recovery process. Next is to click on the “Scan” button.
Step6: Based on drive you select for scanning, the restore process begins. The whole process may take time depending on the volume of the selected drive and number of files. Once the process gets completed, a data explorer appears on the screen with preview of that data that is to be recovered. Select the files that you want to restore.

Step7. Next is to locate the location where you want to saver the recovered files.

Special Offer (For Windows)
.gsed file virus can be creepy computer infection that may regain its presence again and again as it keeps its files hidden on computers. To accomplish a hassle free removal of this malware, we suggest you take a try with a powerful Spyhunter antimalware scanner to check if the program can help you getting rid of this virus.
Do make sure to read SpyHunter’s EULA, Threat Assessment Criteria, and Privacy Policy. Spyhunter free scanner downloaded just scans and detect present threats from computers and can remove them as well once, however it requires you to wiat for next 48 hours. If you intend to remove detected therats instantly, then you will have to buy its licenses version that will activate the software fully.
Data Recovery Offer
We Suggest you to choose your lately created backup files in order to restore your encrypted files, however in case if you don’t have any such backups, you can try a data recovery tool to check if you can restore your lost data.